These are invisiclues and a map for Inevitable (2003) by Kathleen M. Fischer, release 2. Unless otherwise noted, these hints apply to the default difficulty setting. Hints applicable only to hard mode are tagged accordingly. I haven’t bothered to check what’s different on easy mode.
-
Have I locked myself out of victory?
- (Not a spoiler): The game is designed to be polite. If you haven’t died, you should be able to win with a full score, and if you have died you can just undo your last turn. However, there seems to be one bug.
-
At no point in the game are you ever required to PUT (object) IN SOUTH WALL.
-
If you haven’t done that, you’re fine. Don’t unblur the last hint unless you’ve already beaten the game and want to know what this is all about.
-
Inside the ziggurat, there’s a chipped crystal bar on the south wall that crumbles if you try to take it. If you’ve already found the intact bar from the underwater temple, you suppose it’s logical to put that one in its place. However, it doesn’t seem to have been intended that this is possible, and if you do it, you won’t be able to get the bar back and you may be locked out of the optimal ending.
-
How do I get out of my plane?
-
It’s equipped with a safety feature that prevents the canopy from opening under certain circumstances.
-
The canopy won’t open when the engine is engaged, even if it happens to be malfunctioning.
-
Just TURN ENGINE OFF, and then you can get out.
-
-
What’s wrong with the engine?
-
This should be quickly obvious once you’ve had a chance to inspect the plane.
-
You can’t do that during the storm, but as soon as you go NORTH from the Rocky Terrace the storm will end.
-
Now you can return and EXAMINE PLANE and it’ll lead you to the problem.
-
EXAMINE AIR INTAKE and then EXAMINE WIRE.
-
That severed wire is what’s preventing the engine from working.
-
-
Great, so how do I fix it?
-
This was hinted when you initially examined the air intake.
-
You’ll need to find your utility tool.
-
Where is the utility tool?
-
Explore the city. It’s in plain sight from an easily-accessible location.
-
You can see it from the same location where you find its holster discarded.
-
Examine the sparkle in the pile of debris on the avenue.
-
The tool is in an underground chamber underneath the avenue.
-
-
Okay, I see the tool. How do I get to it?
-
This is a late-game puzzle.
-
You’ll need to have solved puzzles in at least three other locations before you can reach it.
-
Specifically, you need to have solved the east and west towers, and gained access to the lower interior of the ziggurat.
-
Once you’ve done all that, see “What do I do in the ziggurat?” for more hints.
-
-
I got the tool. How do I use it?
-
Try examining it.
-
First activate it, then wave it at an item that needs repair.
-
PUSH BUTTON.
-
and then WAVE TOOL AT WIRE.
-
Now to reach one of the game’s endings, you can ENTER PLANE. TURN ENGINE ON. PULL JOYSTICK.
-
-
-
How do I get inside the towers?
-
Have you tried examining them from up close?
-
There are doors in their front, but they don’t have handles.
-
How does one ordinarily open a door which doesn’t have a handle?
-
How does one get out of the Midvale School for the Gifted?
-
PUSH DOOR.
-
-
(HARD MODE) How do I get down from the rocky terrace?
-
The problem you have to solve is explained when you attempt it.
-
The storm is over, but water is still pouring down and making the gully slippery.
-
Where is the water coming from?
-
To the NORTH and WEST of the terrace, there’s a “torrent of water rushing eastward” from a cave.
-
You’ll need to obstruct that flow.
-
The object that’s required is in the same location from which the cave is visible.
-
But the solution requires a little bit of guess-the-noun.
-
Or really, guess-the-adjective.
-
PUSH LARGE BOULDER.
-
-
I have access to the towers and the gully. Now what?
-
Once you’ve explored a bit, if you stand in the playing field, the atmospheric text will suggest where to go next.
-
It’ll send you to the west tower, then the east one, then the north, then the ziggurat.
-
-
What do I do in the west tower?
-
Examine the cistern.
-
Your main goal here is to get the water flowing.
-
This whole city is hydro-powered. But since nothing is flowing yet, you’ll need another energy source to bootstrap things.
-
Examine the box and its contents carefully. Does it remind you of anything you’ve ever seen a diagram of, perhaps in chemistry class?
-
The box is a battery. Or rather, the beginnings of one. You’ll have to finish constructing it to make it work.
-
If you don’t know much chemistry, you can still work this one out through trial and error and a bit of intuition.
-
There are two things that need to be added to the box in order to complete it.
-
Examine the post.
-
There’s a little bit of room at the top of it. Do you have anything which could fit there?
-
On default difficulty, the item you need is already in the room with you.
- (HARD MODE) Otherwise, it’s found in the storage room.
-
The metal token goes on the top of the post.
-
On default difficulty, just leave the tattered disk where it already is.
- (HARD MODE) Grab the wadding out of the box, then put the tattered disk on the post and the metal token on top of it.
-
Now that the post is full, you have contact between your anode (the metal token) and the outside terminal of the box.
-
-
Examine the white powder.
-
Where did it come from?
-
It was deposited from something, and you’ll need to replace that something.
-
It was precipitated from seawater.
-
Is there some of that around somewhere?
- (HARD MODE) You’ll have to solve “How do I get down from the rocky terrace” before you can get to it.
-
You can collect it from the strip south of the rocky terrace.
-
GET BOTTLE. OPEN BOTTLE. EMPTY BOTTLE (the brandy is useless). FILL BOTTLE WITH SEAWATER.
- (HARD MODE) Get the wadding out of the box and then put the small plug in the hole in the box’s bottom.
-
Now put the seawater in the box.
-
-
-
Once you’ve added the correct things to the box, you can CLOSE BOX and the water should begin flowing.
-
In case you’re wondering exactly how this works: the silver-gray metal is likely zinc, and the seawater contains dissolved salt and oxygen. The oxygen oxidizes the zinc, yielding a zinc anion and free electrons which produce current, while the zinc reduces the oxygen and electrolyzes the water, which absorbs the free electrons to form hydroxide cations.
Zn(s) → Zn²⁺(aq) + 2e¯
O₂(aq) + 2H₂O(l) + 4e¯ → 4OH¯(aq)The salt then reacts with the free radicals to neutralize them, forming zinc chloride and sodium hydroxide. The copper is just a catalyst for the oxidation, and the reaction precipitates some excess salt. The complete, balanced reaction is
2Zn + 4NaCl + O₂ + 2H₂O → 2ZnCl₂ + 4NaOH.
-
-
There’s still one more thing to do here after you’ve gotten the water flowing.
-
The whole point here is to power the core with the force of the flowing water.
-
But you’re not doing that, because it’s flying right past.
-
Examine the core.
-
Do you have anything which fits in that groove?
-
You need to put the board in the groove.
-
You can’t do it while the water is running, so you’ll have stop it for a moment and then start it back up.
-
OPEN BOX. PUT BOARD IN GROOVE. CLOSE BOX.
-
-
-
What do I do in the east tower?
-
This one’s pretty straightforward.
-
All you have to do here is push a button.
-
PUSH CUBE.
-
If nothing happened, there’s another puzzle that you have to solve first.
-
Pushing the cube won’t do anything until you’ve completely solved the west tower.
-
Check FULL and if you don’t have a point for “west tower”, you missed something. See the west tower hints if you’re stumped.
-
-
What do I do in the north tower?
-
Examine the angled stone.
-
You need to put something in that hole, but you might not have found it yet.
-
Look around the ziggurat for something that’s an inch in diameter.
-
That crystal bar is what you need, but this one is broken and useless. You’ll need find a replacement somewhere.
-
Thoroughly explore the area south of the rocky terrace.
-
Go for a swim.
-
Go for a dive.
-
From the rocky terrace, go S. W. S. D. D. and then search around underwater.
-
EXAMINE DOLMEN. GET BAR.
-
Now head back to the north tower and PUT BAR IN HOLE.
-
-
What do I do in the ziggurat?
-
Look for a hidden door which leads deeper into the structure.
-
Examine the dolmen.
-
Those three aligned holes look interesting. Do you have anything that would fit through them?
-
There are two items in the game which would flush with the holes, but only one of them is long enough to go through all three.
-
The flag pole from the avenue.
-
Go to the avenue. GET FLAG. GET POLE.
-
Return to the ziggurat. PUT POLE IN LEG STONE.
-
Now you have a lever.
-
PUSH POLE.
-
-
I opened the hidden door, but it’s just a dark dead end at the bottom.
-
That means you got here too soon. Solve some puzzles elsewhere in the city.
-
Solve the west and east towers and then come back here.
-
-
What do I do in the sphere chamber?
-
You’ve had a glimpse of this room before, from elsewhere in the city.
-
There’s something here you’ve been searching for.
-
EXAMINE TROUGH.
-
GET TOOL.
-
-
I got what I was looking for in the sphere chamber, but now I’m trapped.
-
You’ll only encounter this if you solved a different puzzle prematurely.
-
The door only closes when the sphere chamber is fully powered, and having any weight on the tile interferes with that.
-
You can get out by dropping some junk item onto the tile (the tool holster works), but ultimately you’ll want the chamber to be operational so you’ll need the tile empty.
-
Like everything else, the chamber is water-powered.
-
So, stop the water long enough to clear out the chamber and leave.
-
Go back to the avenue and re-raise the edging in the same manner that you lowered it. Get your stuff from the sphere chamber, then lower the edging again.
-
-
-
I finally retrieved the possession I was searching for! Now what?
-
Once you’ve returned to the surface with your utility tool, at least one of the game’s three endings is available to you.
-
You can now fix your ship and take off. If you’re still having any trouble with that, see “Great, so how do I fix it?”.
-
You should fix the ship in any case, because it adds to your score. But ending you get from taking off isn’t the ideal one.
-
To reach the true ending, you’ll need to get the ziggurat fully operational.
-
First, make sure you’ve solved all three towers. They should all be mentioned in your FULL score listing.
-
Next, you’ll need the sphere chamber fully running.
-
If the door closed on you when you picked up the tool, you’ve already solved most of this puzzle. The last group of hints under “What do I do in the ziggurat?” will cover the rest.
-
Like everything else, the chamber is water-powered.
-
You’ll need to get water flowing into the chamber.
-
It could flow in from the avenue where the debris is, but the avenue’s edging is obstructing it.
-
The ridged hole is a sprocket of a mechanism that moves the edging.
-
You’ll need something fits the hole and gives you enough leverage to rotate the sprocket.
-
Search around in the storage room.
-
In the storage room, GET DISK. GET ROD.
-
PUT DISK ON ROD.
-
Now return to the avenue. PUT DISK ASSEMBLY IN HOLE. TURN DISK ASSEMBLY.
-
-
Now everything is fully powered, but there’s one thing in need of repair.
-
The repair won’t take until you’ve done everything else. If there’s something you tried earlier that seems like it should have worked, try it again.
-
There’s an unsightly crack visible in the top room of the ziggurat.
-
You can repair it the same way you repaired your ship.
-
PUSH BUTTON. WAVE TOOL AT CRACK.
-
-
I fixed the ziggurat, and the ambassador showed up. What now?
-
To reach one of the game’s endings, you can just follow him out.
-
But to reach the true ending, you’ll need to discover what this ziggurat actually does.
-
Did you ever examine the etchings inside the ziggurat?
-
TOUCH CORE.
-
This isn’t a vision. You’ve actually been sent back in time and you’re in danger of dying along with everyone else.
-
Your actions do seem a bit limited, though. You can’t walk or speak. What does that leave you with?
-
There was more than one hand on those etchings.
-
TOUCH CORE again.
-
-
-
-
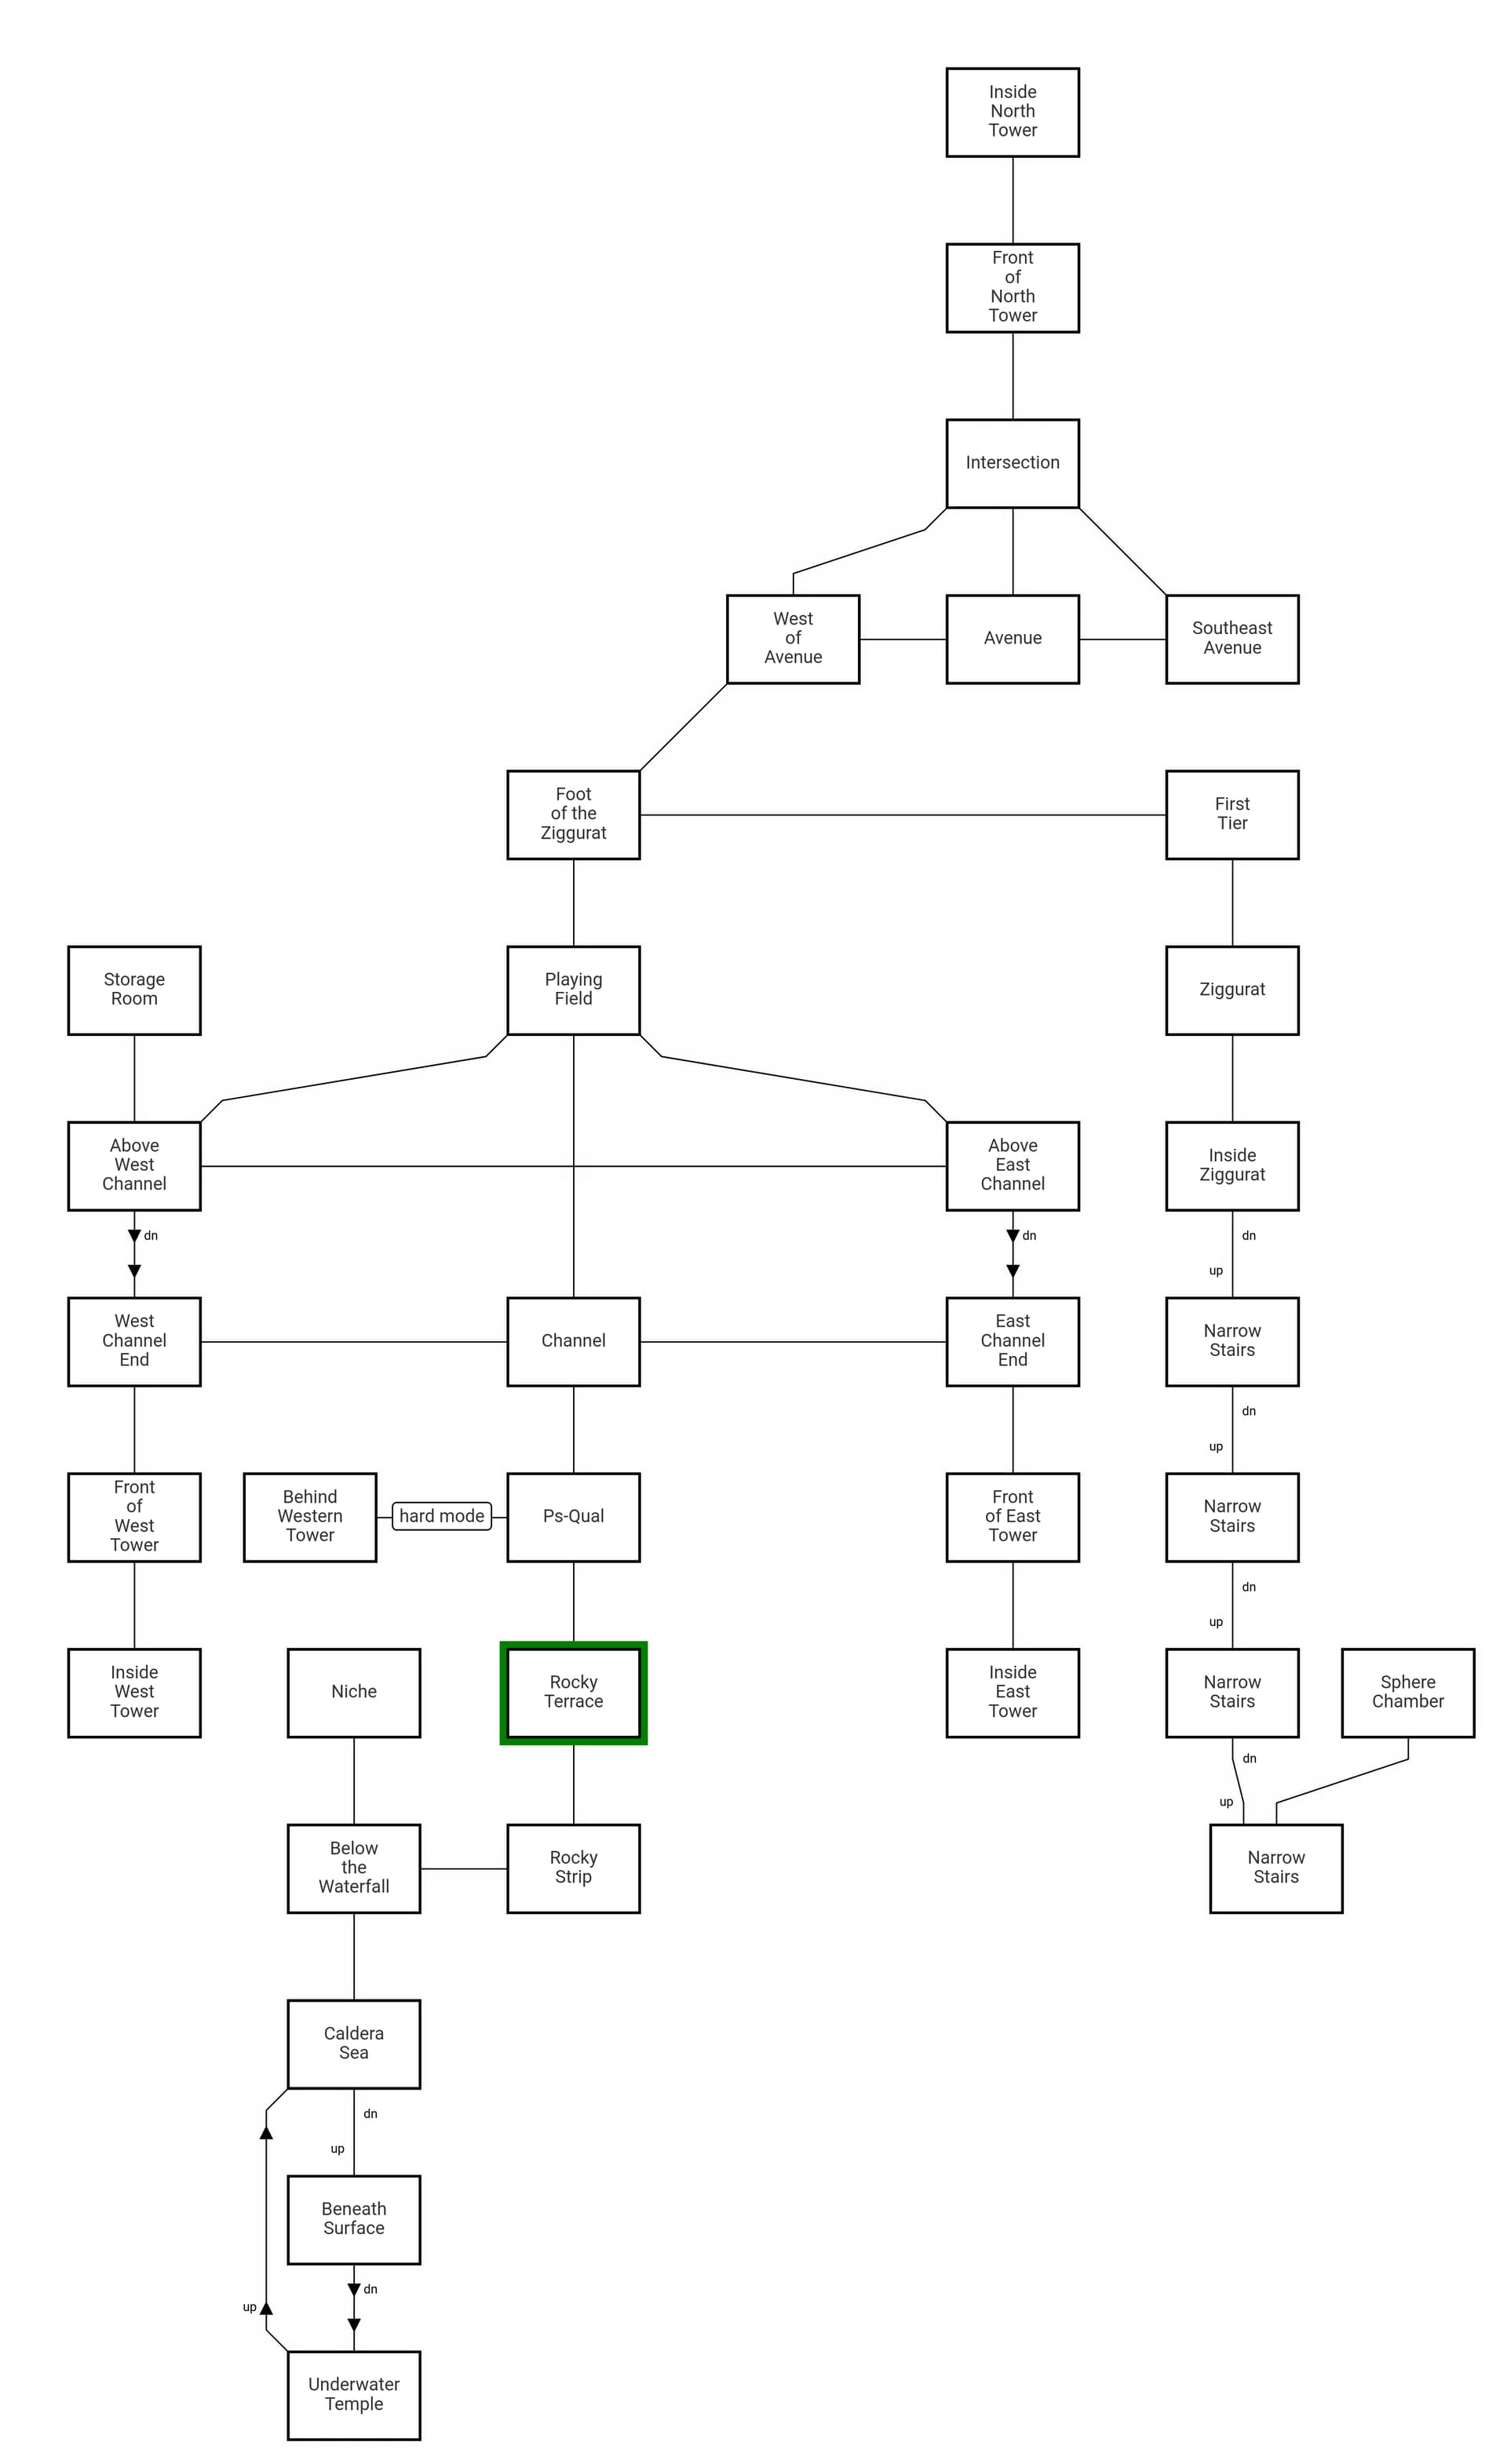
Map: