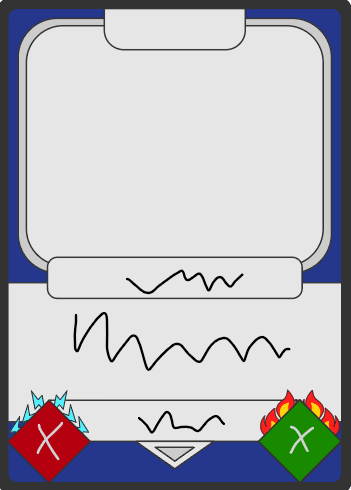
There are a number of details you haven’t supplied, like if the image is being displayed within a Passage using an <img> element or if it’s the background-image of an element. Likewise if the image is always displayed at its native dimensions (351 x 490) or meant to scale based on the current dimensions of the web-browser’s view-port.
If I assume that you’re displaying the image at its native dimensions as a background-image of a HTML element structure like the following…
<<nobr>>
<div id="image">
	<div id="text1">Text 1</div>
	<div id="text2">Text 2</div>
	<div id="text3">Text 3</div>
</div>
<</nobr>>
Then I can use the following steps to position the three “text” correctly.
note: Because I’m assuming native dimensions I will be using px units to size and position the elements in the above structure.
1: Use CSS within the project’s Story Stylesheet area to assign the background-image of the parent #image element. It is important to set that elements CSS position as relative so that we can late move the textural elements into place.
#image {
	position: relative;
	background-image: url('media/screen.png');
	width: 351px;
	height: 490px;
}
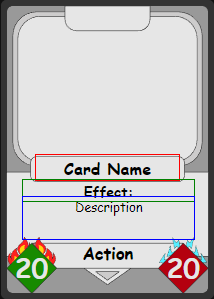
2: Use CSS to temporarily assign a coloured border to each of the textural elements, so it makes it easier to see their starting locations and where they move to when we alter their CSS properties.
#text1 {
	border: 1px solid red;
}
#text2 {
	border: 1px solid green;
}
#text3 {
	border: 1px solid orange;
}
3: View the Passage containing the HTML structure in your web-browser, then use the web-browser’s Web Developer Tools to inspect that structure and the CSS currently being applied to the elements. This will allow you to interactively alter the CSS of each element and to instantly see what effect those changes have visually on the page.
You should current see three coloured rectangles (“red”, “green”, “orange”) at the top of the image, one under another.
4: Select the <div> element with the id of text1 and assign a position: absolute to it in the CSS/Styles area of the Developer Tools. The relevant rule should now look something like…
#text1 {
	border: 1px solid red;
	position: absolute;
}
…and you should see that the “red” and “green” rectangles now share the same line at the top of the image.
5: Assign a px based numerical value to this element’s top property, starting small (eg. 20px) and increasing that value until the “red” rectangle is positioned at the same vertical height as the area of the image you want its contents to appear in.
With trial & error I found a value of 262px seemed right, but you might decide a different value looks better. The relevant rule should now look something like…
#text1 {
	border: 1px solid red;
	position: absolute;
	top: 262px;
}
6: Now assign a px based numerical value to this element’s left property so that the left edge of the “red” rectangle is position horizontally where you want the start of its textual contents to appear.
With trial & error I found a value of 55px seemed right, but you might decide on different value. The relevant rule should now look something like…
#text1 {
	border: 1px solid red;
	position: absolute;
	top: 262px;
	left: 55px;
}
7: Finally assign a px based numerical value to this element’s width property, so that the right edge of the “red” rectangle is placed horizontally where you want the end of its textual contents to appear.
My version of the relevant rule ended up looking something like…
#text1 {
	border: 1px solid red;
	position: absolute;
	top: 262px;
	left: 55px;
	width: 238px;
}
8: Copy the #text1 CSS rule you have just interactively developed into the Story Stylesheet area of project, replacing the existing #text1 CSS rule that was already there.
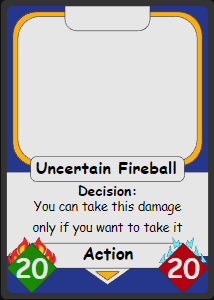
9: Now repeat steps 3 to 8 for the “green” and “orange” rectangles until they are correctly positioned over the relevant areas of the image.
note: If you require the image to scale depending on the current dimensions of the web-browser’s view-port then you will need to use one of the Relative length units (like em or %) to position & size the image and textual elements, instead of the px Absolute length unit I used.