Hello! I’m trying to create text boxes for character speech, and with what I have so far in the CSS area, I get a plain box. I’m not too familiar with CSS, and I’d like to have a border that separates the image icon, the text, as well as a box above showing the character’s name.
I, like Manon, would also suggest looking at Chapel’s Speech Box System addon.
But to answer your question about how to create such a layout, it is all done by placing 4 sided HTML elements inside other elements. And then using CSS to size, position, and style the child elements within the structure. Which is the core technique behind Chapel’s addon.
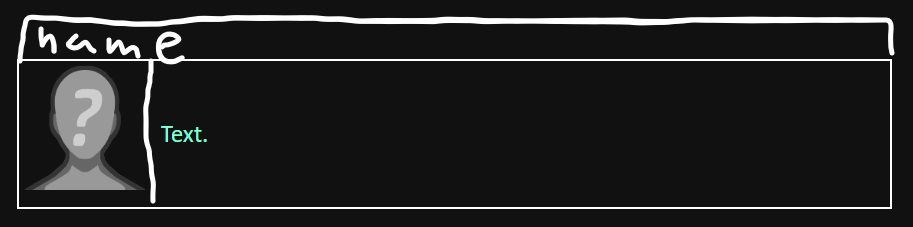
Such a element structure would look something like.
note: The <<nobr>> macro is being used to supress the automatic conversion of line-breaks within the above structure in to <br> elements, as they can play havoc when using CSS to layout the elements in a structure.
Grid based layout CSS like the following can then be used to position the child elements of the structure relative to each other. Such CSS would be placed within the Story > Stylesheet area of your project.
Once you have determined what HTML element structure you need, and the CSS required to style it the way you want, you would then create yourself either a custom Widget or a custom Macro to generate instances of said structure with the correct Name / Image / Text over & over again.
But, you can save yourself all the hard work by using an existing implementation like Chapel’s
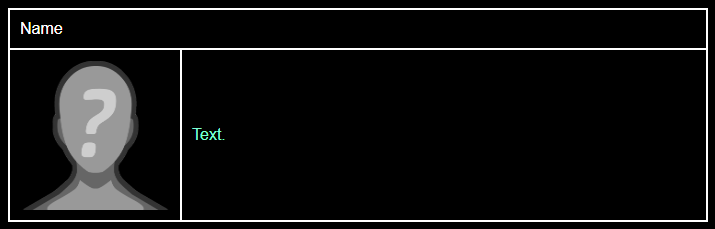
Unfortunately, a lot of table layout attributes are deprecated (not recommended) in favour of CSS standards. Still, some people find HTML structure easier to understand. Here’s your text box done with <table> tags and standard (recommended) CSS.
It was with that guide and a couple of others that I started with. I’ve never used a macro before so I had no idea how it worked, so I haven’t been able to make sense of how to use it.
(either the minified or the pretty, they are the same code, but different formatting)
Then use the <<character>> macro to set up the character in the StoryInit special passage: <<character 'name' 'The Name Displayed on the page' 'the URL of the image'>>
(if you don’t include the The Name Displayed on the page, the macro will display name instead)
Then in the passage you want to use: <<name>>Whatever text you want in the box<</name>>
(the name is the same as the first defined element in <<character>>)
Or you can just use <<say>> without having to setup the box in StoryInit: <<say 'name' 'URL of the image>>Whatever text you want in the box<</say>>