End of Alley
What should I do at the very start of the game?
-
Explore! EXAMINE everything.
-
Go SOUTH from the End of Alley to the Mouth of Alley.
-
Then go SOUTH from the Mouth of Alley to enjoy your sightseeing tour.
What should I do in the Interrogation Chamber?
-
It doesn’t much matter what you do when you first arrive in the Interrogation Chamber.
-
LOOK. EXAMINE every notable thing you can see.
-
Answer the interrogator’s questions.
What answers should I give to the interrogator?
-
You can type YES, NO, or WAIT. Choose whatever answers you prefer to give. (Your answers can affect how much he likes and trusts you.) As long as he keeps letting you try again, you’ve given a “good enough” answer.
-
Just don’t be too stubborn. If you say NO too many times, the interrogator will kill you, so just say YES sometimes. (Or just WAIT when he asks you a question. He never gets angry when you WAIT.)
I’m back in the End of Alley. What do I do now?
-
Your interrogator just said, “you’re going to start by telling me how you got through that door.”
-
Try everything.
-
There’s no way to open the door yet, but if you keep trying things, this scene will end and you’ll return to the interrogation chamber.
-
For example, you can GO EAST repeatedly.
I’m in the End of Alley for the third time. What do I do now?
-
Type INVENTORY to list your possessions.
-
EXAMINE THE LOCKPICK.
-
You’ll need to use the lockpick to open the door.
-
Examine everything you can see here.
-
EXAMINE THE DOOR. EXAMINE THE PLATE.
-
This high-tech lockpick isn’t like a regular lockpick; you don’t need to insert it into a keyhole. What would you do with it?
-
Try touching things with it.
-
TOUCH DOOR WITH LOCKPICK.
-
That didn’t work. Try this instead: TOUCH PLATE WITH LOCKPICK.
-
That did something. Examine the lockpick after you touch the plate with it.
-
The lockpick takes some time. WAIT a few turns after you touch the plate with it.
Equipment
How does my equipment work in general?
-
Examine everything carefully. Compare and contrast their descriptions.
-
There are three categories of equipment: equipment with a minus link (minilamp, scan scrambler, acid pack, blast tab), equipment with a plus link (voice module, radio module, timer, toggle switch, pushbutton) and transmitters with neither a plus nor a minus (voice transmitter, key transmitter).
-
The equipment with a minus link actually does something. The equipment with a plus link can activate the equipment with a minus link.
-
Start by experimenting with all of your “minus” equipment by linking it to the toggle switch, the simplest “plus” gadget. LINK MINILAMP TO TOGGLE. FLIP SWITCH. FLIP SWITCH.
How does the toggle switch work?
-
Try it out. LINK MINILAMP TO TOGGLE. FLIP SWITCH.
-
The toggle switch activates a piece of linked equipment as long as the switch is flipped on.
How does the pushbutton work?
-
Try it out. LINK MINILAMP TO PUSHBUTTON. PUSH BUTTON.
-
The push button activates a piece of linked equipment for just one turn.
-
This makes it useful only for one-use equipment like the blast tab or the acid pack.
How does the radio module work?
-
The radio module is trickier than other “plus” equipment. Try testing other stuff before you try to figure out the radio module.
-
Test the radio module by linking it to something. LINK MINILAMP TO RADIO MODULE.
-
How would you activate the radio module?
-
It has an antenna. What else do you have with an an antenna?
-
The radio module works with the key transmitter.
-
PRESS KEY.
-
The radio module works like the pushbutton. It activates a piece of linked equipment for just one turn.
-
But the radio module has an advantage over the pushbutton.
-
You can drop the radio module and its linked equipment in one room, then press the key transmitter’s key in another room.
How does the voice module work?
-
The voice module is trickier than other “plus” equipment. Try testing other stuff before you try to figure out the voice module.
-
Test the voice module by linking it to something. LINK MINILAMP TO VOICE MODULE.
-
How would you activate the voice module?
-
It has an antenna. What else do you have with an antenna?
-
The voice transmitter works with the voice module. Now, how do you operate the voice transmitter?
-
EXAMINE THE VOICE TRANSMITTER.
-
“The audio keywords are printed along one edge.”
-
EXAMINE KEYWORDS.
-
SAY TANGO. SAY WALTZ.
-
The voice module works like the toggle switch. It activates a piece of linked equipment for as long as the module is switched on (in “tango” mode).
-
But the voice module has two advantages over the toggle switch.
-
You can drop the voice module and its linked equipment in one room, carry the voice transmitter into another room. You can then use the keywords to activate equipment from another room.
-
The other advantage of the voice module is that it uses voice; you don’t have to touch the voice module to use it.
How does the timer work?
-
The timer is trickier than all of the other “plus” equipment. Try testing other stuff before you try to figure out the timer. (In fact, you never have to use the timer to beat the game.)
-
Test the timer by linking it to something. LINK MINILAMP TO TIMER.
-
TURN THE GREEN DIAL TO 2. TURN THE BLUE DIAL TO 2.
-
“(Press the dials to activate them.)”
-
But PRESS THE DIALS doesn’t work.
-
PRESS THE BLUE DIAL and watch what happens.
-
When you press the blue dial, the status dot turns green, the linked equipment activates, and the timer starts ticking. When the timer runs out, the linked equipment deactivates, and the status dot turns blue.
-
Now PRESS THE GREEN DIAL and watch what happens. Try it multiple times.
-
When you press the green dial, the status dot turns blue, and the linked equipment deactivates. When timer runs out, the linked equipment activates (and stays activated), and the status dot turns green.
-
Now PRESS THE GREEN DIAL and then PRESS THE BLUE DIAL while the timer is running.
-
The linked equipment starts in blue “deactivated” mode until the timer runs out; then the linked equipment goes into green “activated” mode until that timer runs out, on an infinite loop.
How does the minilamp work?
-
When activated, the minilamp makes light.
-
The minilamp is the simplest “minus” equipment, ideal for testing complicated “plus” equipment.
How does the acid pack work?
-
EXAMINE THE ACID PACK.
-
Try activating it.
-
When you activate the acid pack, it explodes, melting all metal in the room, and leaving everything else unharmed.
How does the blast tab work?
-
EXAMINE THE BLAST TAB.
-
Try activating it.
-
When you activate the blast tab, it explodes.
-
You can use the blast tab to break things, open doors, kill people.
How does the scan scrambler work?
-
EXAMINE THE SCAN SCRAMBLER.
-
The scan scrambler scrambles scan-web. To experiment with the scrambler, you first have to find some scan-web.
-
There’s some at the start of the game, but you’ll learn the most about scan-web in the Security Annex.
-
The scan scrambler disables nearby scan-web. This can help you circumvent alarms.
The White Junction
What should I do in the White Junction?
-
The puzzle at this point (and for most of the game) is to figure out what to do next, with some help.
-
You’re not really here in the White Junction. You’re really in the interrogation chamber, telling (showing) the interrogator what happened when you were here. You need to do what your character did when you were here, but you (the player) don’t know what that was.
-
Your interrogator knows a great deal about what happened here. If you do something that contradicts his research, he’ll tell you so, and restart the scene. So you need to try a lot of stuff to get him to tell you that you did it wrong, and use his feedback as clues to figure out what you actually need to do.
-
Try going EAST from the White Junction to one of the Corridor Boundary rooms and then SOUTHEAST from the Corridor Boundary. (Note that there are two nearly identical rooms named “Corridor Boundary.” There’s a southern one east of the White Junction and a northern one east of the Corner at Doors. Go southeast from the southern Corridor Boundary.)
-
Try that again. (Your interrogator often gives different messages when you do the wrong thing repeatedly, conveying different clues.)
-
Your interrogator said that you jumped up to the missing panel in the northwest corner. Try that.
-
After you reset, GO NORTH and JUMP. (You can GO DOWN to return to the ground.)
-
Try going southeast from the southern Corridor Boundary again, after jumping to the panel.
-
Your interrogator said that you jumped up there in order to take something away.
-
When you’re up on the panel, EXAMINE THE HOLE.
-
Get the package and go southeast from the southern Corridor Boundary.
How do I open the crates?
-
You can’t open the crates with your bare hands or with the wrench in this room.
-
You can’t open the crates with your blast tab or with the acid pack.
-
You can’t open the crates at all. You don’t need to; just leave them alone.
How do I avoid triggering the alarm (the “sharp buzzer”) at the Corridor Boundary?
-
If you trigger the alarm twice, your interrogator will give you a clue as to how you’re triggering it. (But he won’t repeat the clue if you trigger the alarm a third or fourth time.)
-
Your interrogator said, “We track all metal within the critical zones. I know you’re good; you surely noticed the ceiling web.” “You didn’t carry metal past it.”
-
None of your spy gadgets contain any metal.
-
There’s only one metal thing you could have carried.
-
The wrench is made out of metal.
-
At this point, you may be trying to solve the wrong problem. Stop and think before going on to the next answer.
-
You have a spy gadget that affects metal.
-
Try activating the acid pack in the same room as the wrench.
-
Your interrogator said, “we found the wrench sitting on the crate, unharmed.”
-
Leave the wrench alone. You don’t need it. As long as you don’t have the wrench, you won’t trigger the alarm in the Corridor Boundary.
How do I get past the guards at the Corridor Boundary?
-
Note that there are two nearly identical rooms named “Corridor Boundary.” There’s a southern one east of the White Junction and a northern one east of the Corner at Doors.
-
The guards are only near the northern Corridor Boundary.
-
You won’t meet any guards if you leave via the southern Corridor Boundary.
Tee Junction
What’s my objective here?
-
Just as before, you’re trying to “replay” the events in agreement with what your interrogator knows.
-
He knows that you didn’t get caught by the guards approaching from the north. See “How do I avoid the guards here?”
How do I avoid the guards here?
-
Try getting caught by them a couple of times; you can just WAIT in the Tee Junction. (Your interrogator often gives different clues when you do the same thing.)
-
The second time you get caught, but not the third or fourth time, your interrogator says, “The guards did not see you, not toenail or eyebrow. They heard a noise, something clattering across the floor, in the eastern dead-end corridor. That’s what they investigated. That’s what you’re trying to explain here.”
-
Make a clattering noise in the “Dead End South” room, without being seen. (You may need to phrase your instructions carefully so the parser understands your meaning.)
-
There’s no way to open the “unimportant” metal door in Dead End South, so don’t bother trying.
-
Note that this is a game where you can sometimes interact with rooms without being in that room.
-
You can automatically hide from the guards when you WAIT for them to arrive in the Tee Junction.
-
You’ll need to make the noise (“something clattering across the floor”) while you’re hiding in the Tee Junction.
-
You’ll need to throw something into the dead end room. (But this is the part you need to phrase carefully.)
-
If the thing you throw “lands a short distance away,” then you didn’t phrase it correctly. (You probably just typed “THROW BLAH.” That’s not enough.)
-
Wait in the Tee Junction for the guards to arrive, choose one of your inventory items, and THROW BLAH TO THE EAST.
-
While the guards are investigating your distraction, you can GO NORTH to get past them.
-
If you don’t throw the right object, your interrogator will correct you. (Try it again if you need the interrogator to clarify.)
-
Wait in the Tee Junction for the guards to arrive, then THROW THE LOCKPICK TO THE EAST. Then you can GO NORTH.
How do I open the “unimportant” door in Dead End South?
-
You can’t open it.
-
It’s not yet time.
How do I open the metal door in Tee Junction?
-
It has a metal plate like all of the doors around here.
-
You can TOUCH THE PLATE WITH THE LOCKPICK and wait for the guards to show up.
-
But there’s no way to open the door without the guards noticing.
-
Therefore, you can’t open this metal door at all right now.
How can I go south from the Diagonal Branch?
-
If you go south, the woman (your interrogator calls her “the professor”) will see you.
-
There’s no way to hide from the professor at this point.
-
You can’t go south from the Diagonal Branch right now.
Outside Laboratory
What’s my objective here?
-
Just as before, you’re trying to “replay” the events in agreement with what your interrogator knows.
-
Try opening the laboratory door. (See “How do I open the laboratory door?”)
-
You don’t actually need to open the laboratory door. You just need to sneak past the guards in the Lab Junction room, east of Outside Laboratory. (See “How do I get past the guards at the Lab Junction?”)
How do I open the laboratory door?
-
This would be easy if you had your lockpick, but you can figure out what to do here if you think carefully about the situation, think about what the interrogator has just told you about your mission objectives, and don’t make any false assumptions.
-
Perhaps one of your other spy gadgets could open the door. That would accomplish your mission objective.
-
The acid pack won’t open the door. The black coating protects it.
-
PUT THE BLAST TAB ON THE DOOR and activate it.
-
Your interrogator explains that you didn’t do that, either.
-
You didn’t open the lab door. If you had, you would have accomplished your entire mission objective. So you can’t do it at all, now.
How do I get past the guards at the Lab Junction?
-
Watch them carefully.
-
Listen to them carefully.
-
If you WAIT, they’ll leave to the south.
-
WAIT for them to leave, then go EAST.
Security Annex
What’s my objective here?
-
Just as before, you’re trying to “replay” the events in agreement with what your interrogator knows.
-
Try just leaving this area by going SOUTHWEST.
-
He said that you took a pen. (See “How do I get the pen?”)
-
If you try to leave southwest with the pen, your interrogator will tell you that you used the scrambler exactly four times. What did you do with exactly four scrambler uses?
-
That’s enough to enter and exit exactly two rooms. You used the scrambler twice to enter and exit the Security Storage Room to the south. What else would you have done?
-
Try entering and exiting the Interrogation Chamber to the north after getting the pen, then leaving to the southwest.
-
If you tell your interrogator that you entered the chamber, he’ll kill you. You’ll have to tell him something else.
-
After getting the pen, enter and exit the Security Office to the east.
How do I enter these rooms without setting off the alarm?
-
If you go directly into any of the rooms, setting off the alarm, your interrogator will give you a useful hint. “An amateur, I think, could have walked through a doorway without ever seeing the scan-web above it. And you’ve demonstrated that you’re not an amateur.”
-
If you examine each doorway, you’ll find that they all have bands of “scan-web” on them. You can examine the scan-webs for more information.
-
You have an inventory item that’s designed to handle scan-web.
-
If you activate the scan scrambler, (turning its status dot green) you can enter the rooms without setting off alarms.
How do I leave the side rooms without setting off the alarm?
-
You got into the room by using your scan scrambler, but it stopped scrambling.
-
Examine the scrambler in the room.
-
“You must have brought it into a countermeasure induction field.” The scrambler breaks when you bring it into the room. (That explains the noise and the smoke.)
-
How could you get in and out of the rooms without bringing the scrambler into the rooms?
-
Think about where the scan-web is.
-
The scan-web is in the doorway, not the whole room.
-
You can leave the scrambler in the Security Annex. As long as it’s activated, you can pass through the doorways.
-
But you still can’t get out that way. Try it a couple of times to see what your interrogator has to say about it.
-
“We know how you used the scrambler. On and off, briefly enough to never upset our systems.” Use the scrambler like that.
-
In particular, you’ll have to turn on the scrambler in the Security Annex, but turn it off when you’re in another room. (And back on again as you leave.)
-
There are two different ways to turn off the scrambler from another room. Think about your spy gadgets carefully.
-
You can use the voice module to control the scrambler, or you can use the timer to turn the scrambler on and off without your intervention. (The voice module is easier to use, I think.)
-
DROP THE SCRAMBLER. LINK THE SCRAMBLER TO THE VOICE MODULE. SAY TANGO. GO SOUTH. SAY WALTZ. Now you can take your time exploring the rooms. When it’s time to leave, SAY TANGO before leaving, and then SAY WALTZ when you’re done.
How do I get the pen?
-
The pen is sitting out in the open in the Security Storage Room to the south, but you’ll have to enter without setting off the alarm. (See “How do I enter these rooms without setting off the alarm?”)
-
Then you’ll have to leave without setting off the alarm. (See “How do I leave the side rooms without setting off the alarm?”)
Diagonal Branch
(This section describes the scene played out after the Security Annex.)
What’s my objective?
-
Just as before, you’re trying to “replay” the events in agreement with what your interrogator knows.
-
Try going east or northwest from Diagonal Branch.
-
“There’s someone you forgot to meet. And we did not capture you with your tools – much less that fascinating package.” Find a place to hide your tools.
How do I avoid the guard in the Dead End?
-
Try just letting him shoot you.
-
“He has not yet regained his wits.” You’ll need the guard to lose consciousness.
-
Try HIT THE GUARD. (You can repeat this over and over.)
-
“The guard, for a beginning, was left in considerably worse shape than you have admitted.” How could you leave this guard in “considerably worse shape”?
-
This will require an inventory item.
-
This will require a weapon.
-
Try setting off the blast tab. (Drop it before you use it.)
-
“No magic tricks, no bursts of acid, no explosions; just the truth.” This requires a weapon that isn’t the blast tab or the acid pack.
-
Something sharp.
-
STAB THE GUARD WITH THE PEN.
Where can I hide my tools?
-
You can’t go east or northwest from Diagonal Branch, so you have to hide your tools in the Dead End to the south.
-
First you’ll have to avoid the guard in the Dead End. See “How do I avoid the guard in the Dead End?”
-
Try hiding your tools in the cabinet.
-
There was nothing in the cabinet drawer. Yet somehow you have to hide your tools in this room. Examine everything carefully.
-
EXAMINE THE WALL.
-
There’s a ventilator grille in here.
-
OPEN THE GRILLE.
-
You’ll need to get higher to reach the grille.
-
STAND ON THE CABINET. OPEN THE GRILLE. PUT ALL IN THE GRILLE.
Interrogation Chamber
How do I stop the interrogator from killing me when he sees my stuff on his desk?
-
You’ll have to escape the interrogation chair. See below.
How do I escape the interrogation chair?
-
Before you spoil yourself any further on this puzzle, keep in mind that this is “the puzzle” from Spider and Web, the award-winning puzzle that some people think is the greatest puzzle in any work of interactive fiction. If you take your time and think things through, you can solve it yourself, and you’ll be glad you did.
-
You can’t escape the chair until after the simulation scene in Dead End.
-
As in all good puzzles, start by examining everything carefully. (You might have to restore a few times because you’ll run out of turns examining.)
-
Examine the items on the desk.
-
The items on the desk are important. Stop and think about them.
-
What’s missing here?
-
Remember the items you had in Dead End.
-
In Dead End, in addition to the present items, you had the blast tab, the acid pack, the radio module, the voice module, and, “of course,” the cloth-wrapped package.
-
Why are these things missing? (This may seem like a strange question, but you can figure it out, at least in part, using only the information you have.)
-
Don’t think about the package right now.
-
There’s a good reason these things are missing, and you can use it to save your own life right now.
-
The “story” you’ve been telling your interrogator was a lie. You, the player, didn’t get to tell this lie; you were just playing along with the game. But someone lied to the interrogator (and to you, the player).
-
Your character told that lie. Your character knows more than you, (“of course”) and has a plan to save your life. What is “your” plan?
-
The missing items are supposed to be missing. That’s part of your plan.
-
Your character has been in the Interrogation Chamber before, even though you didn’t go there in the simulation. What would you have done if you’d visited the Interrogation Chamber and had time to plan?
-
Restore back to the Security Annex, go north to the Interrogation Chamber, and mess around in there. (Try leaving the Security Annex with the pen, after entering and exiting the Interrogation Chamber.)
-
It wasn’t possible to escape from the interrogation chair before, because your stuff wasn’t on the desk before this point.
-
If you’d hidden the acid pack in this room, you could use that to bust out of the chair in an instant. But how would you activate it?
-
The acid pack is in the room. Activate it.
-
The acid pack is in the room, linked to the voice module.
-
SAY TANGO.
Outside the Interrogation Chamber
What’s my objective here?
-
With the interrogator gone, you’ll need to figure out what your character’s plan was, what “really happened,” and do it.
-
It might help at this point to replay the game from the beginning, thinking about what’s really happened.
-
The interrogator tells you about your mission after escaping the Tee Junction, and then again after entering the Security Annex for the first time.
-
Your objective is to enter the laboratory.
How do I leave the Security Annex?
-
As long as your interrogator is taken care of, you should be able to leave this room to the southwest without trouble.
-
You need to stop him from activating the alarm.
-
You need to stop him immediately after you escape the interrogation chair.
-
He’s a big talker, but he’s really a wimp.
-
ATTACK THE MAN immediately after you SAY TANGO.
How do I exit the Security Storage Room or the Security Office at this point?
-
The voice module is lost, and the timer is broken. Even the key transmitter is broken.
-
You can’t exit these rooms any longer. You can enter them, and see that there’s nothing left in there that you need.
How do I get to laboratory door?
-
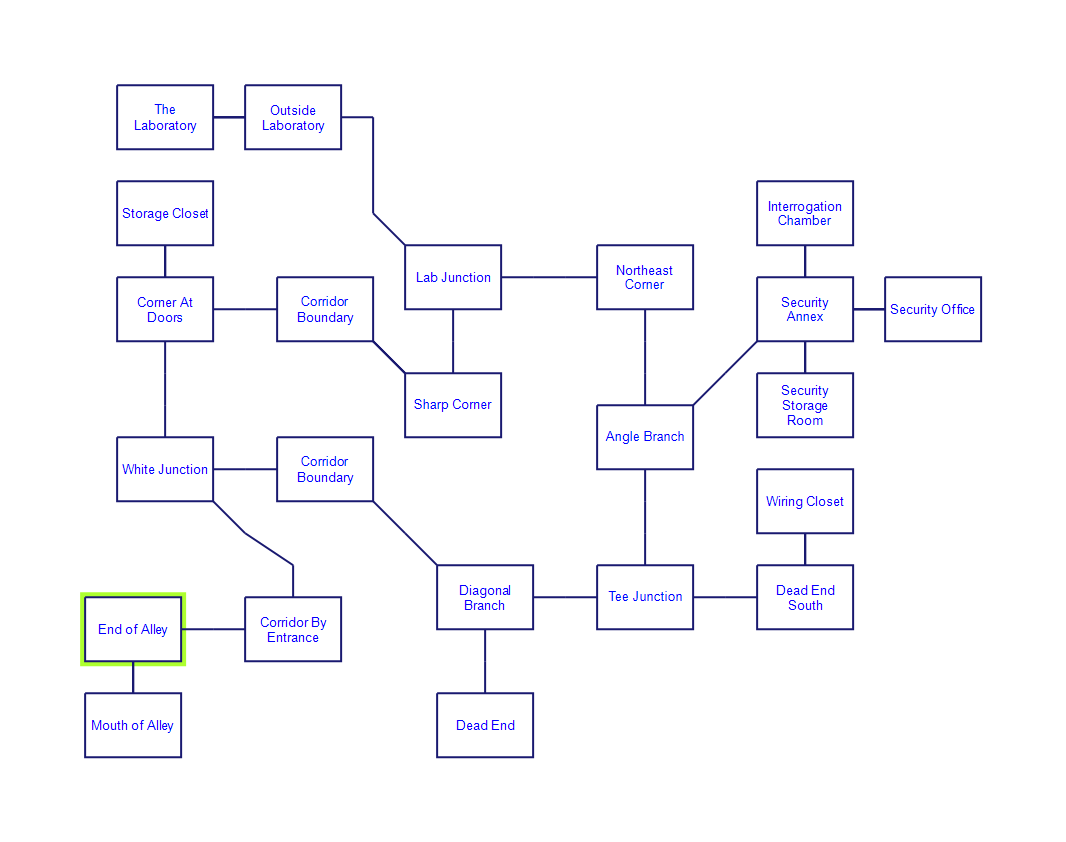
(I’ve provided a map of Spider and Web on IFArchive.)
Try to build out as clear a map of the complex as you can, based on what you’ve seen in the simulation and what you can see here.
-
The most direct path from the Interrogation Chamber is SOUTH to the Security Annex, SOUTHWEST to the Angle Branch, NORTH to the Northeast Corner, and then WEST, but there are guards in the way.
-
You’ll have to go all the way around, via the northern Corridor Boundary (the one east of the Corner At Doors).
-
To do that, you’ll have to go WEST from the Tee Junction, past the guards. See “How do I get past the guards near the Tee Junction?”
-
Once you reach the Diagonal Branch, you can go NORTHWEST to the southern Corridor Bounday, WEST to the White Junction, NORTH to Corner At Doors, and then EAST to the northern Corridor Boundary.
-
Then you’ll have to get past the guards near the northern Corridor Boundary. See “How do I get past the guards near the northern Corridor Boundary?”
-
From the northern Corridor Boundary, you can go SOUTHEAST to the Sharp Corner, NORTH to the Lab Junction, and then NORTHWEST to Outside the Laboratory.
How do I get past the guards near the Tee Junction?
-
As always, you’ll need to cause a distraction using one of your spy gadgets.
-
Explore thoroughly, finding all of the rooms you can visit.
-
There’s a room that you didn’t visit with your interrogator that you can visit now.
-
Go to Dead End South and TOUCH THE PLATE WITH THE LOCKPICK.
-
Your blast tab is there in the wiring closet. Why is it here?
-
Activate it. (This was all part of your plan.)
-
The blast tab is linked to the radio module, which you’d normally activate with the key transmitter, but the key transmitter is broken, so you’ll need to link it to one of your other devices first.
-
UNLINK BLAST TAB. LINK TAB TO PUSHBUTTON. PUSH BUTTON.
-
You can now explore more places.
How do I get past the guards near the northern Corridor Boundary?
(Note that there are two nearly identical rooms named “Corridor Boundary.” There’s a southern one east of the White Junction (northwest of Diagonal Branch) and a northern one east of the Corner at Doors.) This question is about the northern Corridor Boundary.
-
Your character had a plan for this, too. You just have to figure out what your own clever plan was.
-
You’ve accounted for most of the missing items from the desk. Only one remains.
-
Where is the package?
-
Return to the Corner At Doors, jump, and examine the room carefully.
-
There’s something you can examine in this room that isn’t explicitly mentioned in the room’s description.
-
Return to White Junction and examine everything there.
-
EXAMINE THE WALLS.
-
EXAMINE THE GRILLE. (Did you notice that there’s one of these in almost every room in the complex? You probably didn’t notice because you’d have to examine the walls.)
-
In the Corner At Doors: JUMP. OPEN THE GRILLE.
-
GET THE GUN.
-
Bring the gun back to the northern Corridor Boundary.
-
The guards don’t notice you.
-
SHOOT THE GUARDS.
How do I open the laboratory door?
-
After all you’ve been through, this should be the easy part.
-
EXAMINE THE DOOR.
-
TOUCH THE PLATE WITH THE LOCKPICK. Then just wait for the door to open.
To be continued…