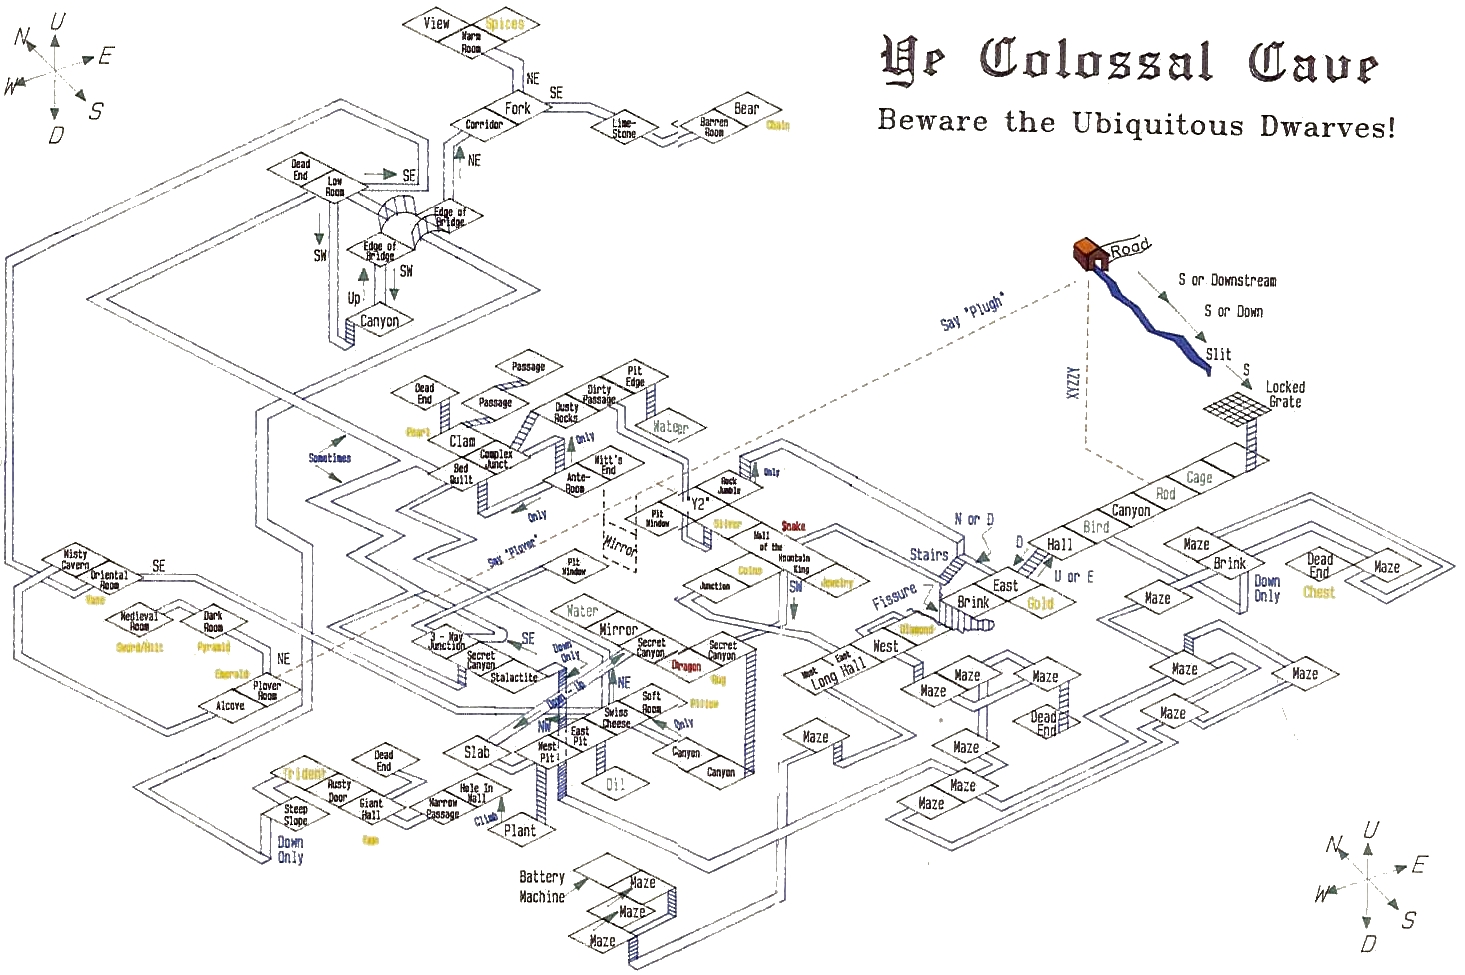
Oh, the coal mine. Some neat things coming up. Also some less-than-pleasant things. Just try to come in prepared, and don’t blame me if you suddenly start yelling at the game because you’re in another… ah, but that would be telling! (laughs evilly)
Yes, there is something going on with the oddly-similar Mirror Room complexes. It’s not strictly necessary to figure any of it out. (However it can be convenient for experienced adventurers who know what they’re doing.)
Oh, wait, I forgot about the other thing that will cause an…interesting reaction before you get to the area I was thinking of. (Which might cause you to get into said area faster, if I remember how it works if its puzzle isn’t solved.)
The coal mine is an interesting zone. My memory is that it’s not really “hard” per se as much as one that you’ll have to run through several times to get the ultimate outcome successfullyu, but it is fairly logical. (And mostly non-fatal, too, with possibly one nasty surprise.)
We went SW from the large low room, an exit we had not tried yet. We arrived at a bridge on a chasm, where a troll demanded a treasure before letting us cross. But giving away a treasure would cost us points… Aha! The golden eggs. We can give the eggs to the troll, then say the “FEE FIE FOE FOO” magic word to warp them back to the Giant Room.
In one fork of the cave past the bridge, we beheld a breath-taking view and found rare spices (a treasure). In the other fork, we tamed a ferocious cave bear by giving it food, and unlocked the golden chain (another treasure) that held it to the wall. The troll reappeared when we tried to return over the bridge, and demanded another treasure. This time we were forced to give him one that we would not be able to recall.
In the room with the emerald, we discovered the magic word “PLOVER” that warps between there and Y2. The magic word lets us warp into the emerald room while holding the lamp, and from there continue into the Dark Room, where there is a platinum pyramid.
We pried open the clam with the trident. The clam was actually an oyster, with a pearl inside! (I never was very good at identifying bivalves.)
We then took a long tour through the cave to visit all the pieces of treasure we knew about, delivering much of it to the building. You can keep the vase whole when you drop it, if you drop the pillow first. We were experimenting with ways to deal with the dragon when a sepulchral voice intoned:
Cave closing soon. All adventurers exit immediately through main office.
Magic words no longer worked to exit the cave. We were headed for the grate when a flash of light put us in the repository, a mysterious pair of rooms full of game objects. We found a hint written on an oyster there, but decided not to read it just yet. Despite a written warning, we poked a sleeping dwarf, resulting in our death under a hail of nasty knives. But it’s an ending!
New personal best by far: 225/350 points, rank of Junior Master.
We went over the rainbow, past the top of Aragain Falls, along the east shore of Frigid River, to a sandy cave. We dug up a scarab with a shovel we found on the way. Digging a bit too eagerly, we got buried in the sand and died before we could try the shovel anywhere else.
On a new run we suffered a couple of quick deaths: a combat loss to the troll and forgetting to take the lamp with us underground. Undaunted, we made our way back to the dam. The yellow button alone suffices to activate the control panel. So what’s the brown button for? It’s possible to get down to Reservoir South while the reservoir is still draining, before it’s actually passable. (And we wondered: is there any reason to re-flood the reservoir?)
We returned to the Slide Room (stopping on the way to break the second mirror and further ponder the “Granite Wall”). Beyond the Slide Room is the Coal Mine, a mini-maze where a vampire bat dropped us into random rooms. There’s a bracelet in the Gas Room, which explodes when you light a match (or, presumably, carry a torch or lit candles). Down a ladder there’s a pile of coal, a broken timber, and a narrow passage into a dark room, reminiscent of the alcove and plover room in Adventure. The only thing we had that was small enough to fit through the narrow passage was the matchbook, but it’s too drafty inside to light a match.
We took the magic boat out on the stream west of the drained reservoir, but it doesn’t seem like there’s much there. The boat breaks if you’re holding something sharp, but you can use the gunk to fix it. We then launched the boat from the base of the dam, and began a merry voyage down the Frigid River. The boat moves downstream automatically when you WAIT or pass turns doing other things. The river took us past the beaches at the base of the canyon that were accessible from the initial overworld. It connected to the sandy beach and cave on the eastern side, above the waterfall. Just before the waterfall, we grabbed a red buoy that contained an emerald. Sailing over the waterfall had the predictable outcome.
The bat is indeed, straight out of Hunt the Wumpus. IIRC, early versions explicitly mentioned Wumpus specifically, but they dropped the text later on. I believe it’s another case of them dropping a reference which less people playing this at home would get.
Reach the waving figure across from the window on pit.
Figure out how to pay bridge toll on the way back without losing points.
What does the black rod do?
We started a new run and headed straight to the dragon. Talking to the dragon doesn’t work. You cannot climb on it or ride it. It’s not interested in food or water. The game doesn’t know the word “hug”. The rod doesn’t seem to do anything. You can’t fight it… unless you do it with your bare hands!
Past the dragon there was a secret north–south canyon. Going down from the secret canyon took us to the familiar Slab Room; going back us returned us to the secret canyon. Amazing—we could have gotten here at any time, even before defeating the dragon.
Continuing to the north, we arrived at the mirror canyon. The canyon is 25 feet wide (the same distance as from the window on pit to the opposite window with the waving figure). Parallel to the canyon walls there hung, high above, a two-sided mirror, halfway between two windows on opposite sides of the canyon… That explains it. The mysterious waving figure 25 feet away was actually us—our own reflection in a mirror 12½ feet away. There was a window 25 feet away across the canyon, but it was behind the mirror, where we couldn’t actually see it. At the end of the canyon there is an underground reservoir, possibly the source of the mist in the cave.
We figured out why the game was reacting oddly to our EXPLODE command with “Where?”. The game only looks at the first 5 letters of each word. There is no EXPLODE command, but there is EXPLORE, which is what the game interpreted it as. We started using BLAST instead when we wanted to try to explode something.
We crossed the bridge using the trick with the golden eggs. But we had neglected to take the keys with us this time, so we could not unlock the bear’s golden chain. Rather than return for the keys over the bridge (which would cost us a treasure for the toll), we took an intentional death to warp back to the house and get the keys. (It costs us points either way.) We returned to the barren room and fed and unlocked the bear. After freeing the bear, TAKE BEAR makes the bear start following you. We led the bear back to the bridge and let it scare away the troll, so we could cross the bridge without paying a return toll.
We made a tour to round up the rest of the treasures and take another stab at the final puzzle. The lamp was getting dim, so we bought fresh batteries from the vending machine in the maze—the first time we had successfully done that. We waved the black rod at the fissure. Something would have happened, if the cave had not already started to close.
In the repository, taking a close look at things, we noticed there were two kinds of black rod: one with a rusty star (as we had seen in the cave) at the northeast end, and one with a rusty mark at the southwest end. We could hold one of each in our inventory. This time, we read the hint written on the oyster: “There is something strange about this place, such that one of the words I’ve always known now has a new effect.” We tried dropping both rods at the northeast of the repository. Standing at the northeast end, we said BLAST, something exploded, and we died. Still not the good ending, but we’re getting closer!
Here’s a collection of ways Adventure’s mirror canyon has been depicted visually.
The pen plotter map from Rick Adams’s page shows the mirror (dashed lines) hanging about the mirror canyon room (also labeled “Mirror”) and between two "Pit Window"s.
This is how the mirror appears in the first-person view of Colossal Cave, the 2023 3D remake. There is an achievement for solving the mystery of the shadowy figure. Image from @edenwaith.
Dave Lebling’s (of Zork) own map of a very early version of Adventure, predating the common 350-point version. This map notably doesn’t have a SW exit from the Hall of the Mountain King to a secret canyon leading to the dragon (though there is an E exit from the canyons south of the Swiss Cheese Room in the full map).
A painting by Susan Heinz, originally distributed by the Heathkit Electronics Center. It was used for the cover of the February 1983 issue of REMark magazine. I love the depiction of “windows” as frames with panes of glass.
A section of a map posted to the Colossal Cave Adventure forum in 2015. There’s no information about it other than it was bought “in the mid-80’s (c. 1983, 1984) at a Kaypro Users Group meeting”. Interestingly, this one doesn’t put the windows directly adjacent to the mirror canyon; instead they are closer to the Hall of the Mountain King. This map depicts the underground reservoir as being behind a dam, as in Zork!
If I remember right, the window with the shadowy figure waving back was in Crowther’s original game, while the mirror and the second window were added by Woods.
At least one of the extended versions also added a magic word that lets you teleport between the windows directly, too. It is however, like the rest of the whole setup, totally optional to figure out.
The game (Woods) comments “THE MIRROR IS OBVIOUSLY PROVIDED FOR THE USE OF THE DWARVES, WHO AS YOU KNOW, ARE EXTREMELY VAIN.”
Graham Nelson (in his Inform port) cleverly expanded on this by having the dwarves stop chasing you if you move through the mirror canyon. Knowing this is still optional, but it’s both useful and consistent with (as it were) “canon”.
Stifled at every turn! We started with a lot of good ideas after making many discoveries in the last episode. But things just weren’t going our way today.
We wanted to take the clockwork canary to the coal mine—but the jeweled egg wasn’t were we had left it.
We tried to take the torch through the narrow passage past the coal mine (where it is too drafty for a match), but the torch is too large to fit. We were thinking about this puzzle all wrong—what we probably need to do is lower the torch in the basket from the Shaft Room, where it will presumably end up in to the dark room. (Our mental model was that the shaft in the Shaft Room would connect to the shaft at Mine Entrance, but that surmise was wrong.)
We tried to defeat the vampire bat by preliminarily eating garlic (to give us garlic breath). That doesn’t work either—probably we just need to hold the garlic, not eat it.
Our guess about the brown button in the dam maintenance room was correct. Pressing the yellow button activates the green bubble on the dam control panel (allowing you to to turn the bolt). Pressing the brown button deactivates the green bubble. Yellow and brown are idempotent, unlike red, which is a toggle.
We waved the sceptre, made the rainbow, and dug up the scarab, with the intention of taking it to the gold coffin. (Because they are both Egyptian?) But the thief robbed us of it all before we could get there.
We returned to the thief’s treasure room for another showdown. This time we threw the rusty knife at the thief, but it works the same as giving it to him. A ray of hope, though: we managed to do some damage to the thief (“a shallow gash”) before getting killed. We tried to take advantage of the ghostly vision you get after being resurrected, to see what’s in the dark room past the narrow passage, but it wouldn’t let us in (“You cannot enter in your condition”).
Starting a new run, we grabbed the jewel-encrusted egg and the torch and headed for the coal mine, intending to have another try at the canary in the coal mine and the operation with the torch and the basket. But the thief stole both items en route.
We tried again with the vampire bat. Just carrying the garlic (or dropping it in the bat room) is enough to make the bat leave you alone. We made one good discovery: TOUCH MIRROR teleports you from one mirror to the other.
We experimented with the boat. The stream in Reservoir North doesn’t lead anywhere. The stream by Stream View doesn’t seem to lead anywhere either. Re-flooding the reservoir lets you take the boat from Reservoir South to Reservoir North, but otherwise doesn’t expand the set of movement options. After grabbing the buoy on the river, the game says, “you can land either to the east or the west”, but we didn’t get a chance to try either one, before being forced downstream.
The fabric of reality started to unravel as dropped items inexplicably moved to different rooms, making us suspect some kind of memory corruption error. Next time we’ll start fresh!
My understanding is that the “scattering” of objects above ground only aplies to non-treasures. any treasures you have are left somewhere in the underground (where they’re of course subsequently liable to be taken or moved by the thief.)
My reading is: If the player was carrying the lamp, put it in the living room. If the player was carrying the coffin, put it in the Egyptian room. Make the sword stop glowing if it is (so it doesn’t accidentally get counted as a treasure). Then, for each remaining item in the player’s inventory, if it’s a treasure (P?TVALUE is greater than 0), walk cyclically through the rooms that have RLANDBIT set and ONBIT unset, and drop the item in the first room for which a <PROB 50> random roll passes (which is actually a 49% chance). If it’s not a treasure, place it in a random ABOVE-GROUND room.
If I’m reading it right, then the distribution of non-treasures above ground is uniform, while the distribution of treasures is not. There’s a 49% chance each treasure will be placed in the first room with RLANDBIT set and ONBIT unset, a 25% chance it will be placed in the second such room, a 13% in the third, and so on.
I guess this is meant to prevent a certain way of circumventing the coffin puzzle. The whole thing with the coffin is it’s too big to carry through the passage from SOUTH-TEMPLE to TINY-CAVE. You’re meant to PRAY to warp back to the forest, or TREASURE/TEMPLE to warp to the treasure room, to get the coffin out. If not for this check, there would be another way: let yourself be killed, and let the coffin be moved to some other room from which you could simply carry it back to the trophy case. (This way would prevent you from winning the game, because dying costs points.)
There’s something similar in Adventure. When the pirate robs you, he takes any treasure you are carrying, except when it’s “too easy”, which is when the treasure is the platinum pyramid and you’re in the plover room or the dark room (where the pyramid is found).
#define too_easy(i) (i == PYRAMID && (loc == proom || loc == droom))
As with the coffin, the puzzle with the pyramid is how to get it out, when it’s too big to fit through the narrow passage from the plover room to the alcove. You’re supposed to use the PLOVER magic word to warp back to Y2. But if not for the “too easy” check, there would be another way: drop all your items at the alcove, go through the narrow passage to the plover room, go NE to the dark room, GET PYRAMID (which you can do despite not seeing it, because the room is dark), then wait for the pirate to rob you and transport the pyramid to the maze.
But I don’t know, the check seems unnecessary to me, because the only way you would even know that there’s a pyramid in the dark room is if you already knew the magic word PLOVER to get into the dark room carrying the lamp. And with the magic word you can get out again, more easily than waiting for the pirate to random-walk into the plover room.