I agree with HiEv about using the <> macro to remove the
elements that will automatically be added to the generated HTML, however I added your CSS to the Story Stylesheet area of a new project and your HTML structure to that project’s main (Start) passage like so.
(note: example is using TWEE Notation)
:: Story Stylesheet [stylesheet]
.row {
  display: flex;
}
.container {
  position: relative;
  width: 40%;
  padding: 5px;
}
.image {
  opacity: 1;
  display: block;
  width: 100%;
  height: auto;
  transition: .5s ease;
  backface-visibility: hidden;
}
.middle {
  transition: .5s ease;
  opacity: 0;
  position: absolute;
  top: 50%;
  left: 50%;
  transform: translate(-50%, -50%);
  -ms-transform: translate(-50%, -50%);
  text-align: center;
}
.container:hover .image {
  opacity: 0.3;
}
.container:hover .middle {
  opacity: 1;
}
.text {
  background-color: #4CAF50;
  color: white;
  font-size: 16px;
  padding: 16px 32px;
}

:: Start
<div class="row">
<div class="container">
  <img src="img/apple.jpg" alt="Avatar" class="image" style="width:100%">
  <div class="middle">
    <div class="text">Apple</div>
  </div>
</div>
<div class="container">
  <img src="img/apple.jpg" alt="Avatar" class="image" style="width:100%">
  <div class="middle">
    <div class="text">Apple</div>
  </div>
</div>
</div>
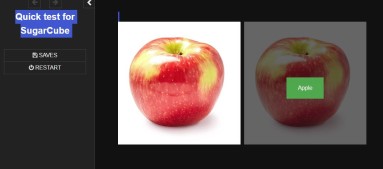
… then viewed the resulting story HTML file within Chrome and saw the following.
As stated by HiEv, we would need to see the code within your Twine project to be able to debug why you are seeing the result you are.
note: If you are new to using CSS flex then I suggest reading this css-tricks article, as it may help with you using features like justify-content, flex-grow and flex-wrap.