I am having a heck of a time getting the screen to look the way I’d like. I’d basically like a series of sprites anchored in a single graphics window above the main window. It’s displaying, thanks to the painstaking tutorial on the Glimmr blog. But I’m having trouble getting it to display in a consistently attractive manner. I’m using a combination of Glimmr over Flexible Windows, and even using one graphical window, the only way I’ve found that works is forcing window size to my personal display. Proportionally sized windows just never seem to behave as I’d like. Sometimes they center; sometimes they have extra padding on three sides, sometimes on four sides (meaning the images in the window could scale up, but mysteriously doesn’t). Even with the forced window size, graphical elements still scale, so there’s still borders in less-than-ideal places.
I feel sort of queasy about locking down sizes of things; I suppose people can always play without the graphical elements, but that doesn’t seem entirely sporting. (Besides, even I sometimes play with a half-screen, so I can take notes or watch videos while I play, and that instantly makes the whole thing off again.) Can any authors who have done the work of adding graphical elements give me some advice on set-up? It seems like the options may be there, but I’m just not experienced enough to know what combo will give good results. I feel like I’m 80% of the way there, but that last 20% is the difference between “awkward amateur” and “competent”.
The unpredictable window sizes of Glulx can be difficult to work with. The Treaty of Babel has some guidelines for allowing the author to control the overall window size or at least the aspect ratio via a blorb metadata specification, but I don’t think any of the interpreter authors have implemented it. Glimmr’s canvas is an attempt to deal with the inherent variability by providing a solution that is likely to work for a large number of applications (but guaranteed not to work for all).
I’m not sure, because your description doesn’t seem to match the standard Canvas-Based Drawing behavior, but I think that you might be helped by a bit more on the concept of the “canvas” in Glimmr. I’ve spoilered the explanation since it’s long and may not be what you need:
[spoiler]Glimmr’s “canvas” is an independent coordinate system which is scaled down and fitted to the window as need be, but always maintains its integrity; that is, it is always displayed at the same aspect ratio, and with the elements arrayed on it maintaing the same scalar and spatial relationships to one another.
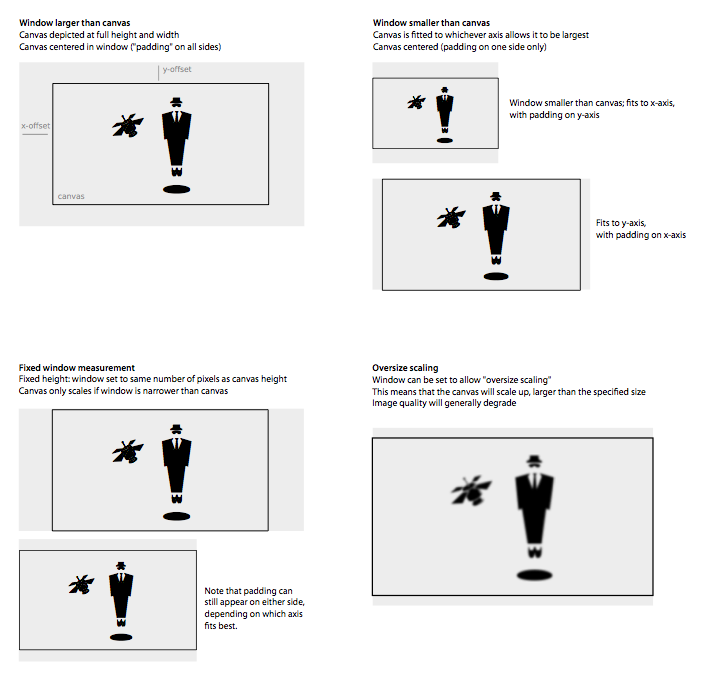
By default, the canvas will always be as centered in the window as we can make it, and it will always be as large as we can make it (without oversizing it; see below). Usually, this means that there will be a margin either above and below or to the right and left of the canvas area. If the canvas is smaller than the window, there will be padding on all sides. You describe seeing padding on just three sides; that’s not really something that can happen w/o customization on your part.
The canvas is not scaled up by default, because that would be a violation of the canvas’s integrity; it’s usually safe to assume that if the author wanted the canvas larger, she would have simply designed it to be larger. (And it’s not a good idea to assume the opposite, because if scaling images larger than their original size will result in degraded quality–that’s not fair to the author.) So, if you want to see a larger canvas, you have two options: (1) increase the size of the canvas and images; (2) you can set the “oversize scaling” property of the window to true, which will allow the canvas and the sprites displayed on it be scaled to greater than 100%; again, this can result in degradations of quality for images, which is why it’s off by default.
Here’s a visual guide to the canvas-window relationship:
A tip: to see exactly what’s happening with your canvas, you can include this code in your game:
[code]The canvas outline is a box primitive. The tint is g-White. The associated canvas is the .
Element scaling rule for the canvas outline:
now entry 1 of the endpoint of the canvas outline is the canvas-width of the associated canvas of the canvas outline;
now entry 2 of the endpoint of the canvas outline is the canvas-height of the associated canvas of the canvas outline;
continue the action.[/code]
This will draw a box around the canvas so you can see the relationship to the window more clearly.[/spoiler]
Can you describe what you want to see happen at various window sizes? That is, describe how you would like the display to be handled? That would make it easier to provide specific implementation/coding suggestions. You can do just about anything, from anchoring the canvas to one side of the window, to dynamically changing the amount of space between the sprites, to just adding decorative edging elements that ignore the canvas scaling… Of course, some solutions require more specific code than others!
(Please feel free to post screenshots if that will help, or if you want to avoid spoilage, email them to me at erikDOTtempleATgmailDOTyouknowwhat.)
By the way, I wouldn’t worry too much about setting a fixed window height, as long as you don’t set it to be really large. In principle, it’s not really any different from assuming that they will be able to see all the text in a three-part status line (left, middle, right).
Personally, I never play with the main window wider than about 80 characters or so. Reading long lines is tiring.
Er, screenshots. Sure! Elements are theoretically scaled properly, but actual image elements are, um, alpha. I might stretch the canvas out some, but that would probably not change the actual scaling - just involve more trees in the middle or something. The map size may need altering as well - the inventory window needs a relatively large amount of space, and it’s hard wedging in a square map. Advice welcome!
This seems to be the best look at the moment - it uses the grass color to backfill the top window and the map window:
Even when the dimensions change, it’s not too horrifying.
(This does require an extra element over previous versions, but I’m assuming a rectangle primitive for the sky is about the least intensive graphic element ever.)
This looks less awesome when the map background and the top window background differ, which they’ll need to at some point; as the seasons change, green looks fine for a small area of grass, but sears retinas in larger doses unless it’s pretty dark. One option is extending the status bar color to the map window, which is fine when everything is nicely sized:
But weird otherwise:
I tend to feel best about the pictures where the top image fills the bar. If the backfill of the top window isn’t the grass color, it often “floats”, which looks off to me.
(Although sometimes it looks weird if the sun is cut off by grass color, and it looks “off” at night, when the sky is dark.)
I could drop the map and inventory window; that may be the best option. (There would be a location marker on the map sometime in the future.)
I could also, I suppose, change the top image to, say, looking up. The essential elements are season, time, and weather; that’s possible to communicate by, say, looking up towards the sky through some branches or something.
Any suggestions are appreciated.
Edit: Just realized that I deleted specifics. I’d like the top image of trees and sky and stuff to fill the top window entirely. That may mean that in a smaller window, there’s only some of the center screen (cutting off the larger tree and/or cliffs). Barring that option, I’m not sure; bracketing by decorative elements off-canvas would be okay (but not possible?). Basically, I’d like there not to be any double-takes from the player as they scale the window; right now, there’s a couple sweet spots, but a lot of jarring elements where various rectangles come together at off-angles.
It might be better to have a ground image that extends 1000px down and a sky image that extends 1000px up, both of which are 4000px wide and meet at the horizon, where you are layering in the sprites.
Then regardless of how the player sizes the window, the backdrop will look “right” - you would just need to add in more trees, grass, clouds, etc as new areas were exposed by resize operations.
You could probably leave the ground image as a fixed size, since if the player resizes the window horizontally they will expect to see more trees / landscape, and if they resize vertically they would expect to see more sky. With the possible exception of Nitfol, I don’t believe any Glk libraries allow the player to resize internal borders, so the player would be unable to directly express a desire to see more of the ground cover.
Alabaster uses a similar technique of images that extend extremely far in one direction, which are then scaled and composited together.
Thanks for the images; that helps. It definitely seems that the default approach to the canvas doesn’t work for you.
Just to clarify: I’m assuming that your separate elements are sky (rectangle primitive) + trees (displayed as a single sprite) + sun (a sprite whose position varies to indicate the time) + grass (a single sprite).
The solution that springs to mind is either write a new rule for managing display, or just interceding a bit with the canvas to change the default behavior. I usually do the latter myself–in most cases, it’s easier. To wit:
Define the sprites so that they are “center-aligned”–this will cause the origin of the sprite to be considered as the center of the image, rather than as the upper-left corner;
Intervene at the beginning of the window-drawing process to change the canvas size dynamically, so that the canvas is always the same size as the window.
Change the element scaling rules for the sprites so that they are repositioned based on the center of the canvas (giving them their own kind will make it easy to manage this with a single rule). This means that the origin coordinates of your objects will be offset from the center of the window, rather than from the upper left corner of the canvas: {0, 0} would be the center of the window, while {-100, 10} would 100 pixels left and 10 pixels below the center. Now the composite image will always be centered, but will not be scaled, and so will be cut off on the top and sides for smaller window sizes. The element scaling rulebook is probably the best place to do this, and the code would look like this, more or less:Element scaling rule for a stationary-sprite (called the pict):
let coords be the center-point of the <canvas>;
now the win-x of the pict is (entry 1 of the coords) + (entry 1 of the origin of the pict);
now the win-y of the pict is (entry 2 of the coords) + (entry 2 of the origin of the pict).
Draw the sky rectangle dynamically so that it’s sized and positioned correctly.
I may be forgetting some small thing, but that’s about all you need, I think. This may not work well for smaller window sizes (since the canvas and images don’t scale down). I would recommend, as Ben also does, that you extend the image wider on both sides, to catch everything (the sky on top and background color/grass on the bottom give you more leeway there).
Let me know if this works for you; I may turn it into a tutorial one day.
For the map, I’d suggest a solution similar to my suggestion for the status image–don’t allow the map to scale (or scale manually based on the window size). This way, the map will be cut off by the edges of the window. If you dynamically recenter the window on the player’s location, there will never be any problem with the current region being cut off. Plus, the map may appear to scroll a bit as the player moves; a nice bonus. You’ll still see margins when the player is near the edges of the map, of course, but this will now be visually meaningful–the borders appear because the player is close to the limit so the map.
. . . say! That’s . . . not bad at all. And better once I get the sprites teased apart and layer extra ones beyond the official canvas so it looks a little less, uh, square. Somehow I expected that post-canvas sprites would break things, but it’s . . . actually landscape-like!
Rock on.
Your assumptions are nearly right; there’s actually a few more pieces than that, but nothing that can’t be positioned in the way we’re discussing. (Clouds are their own thing; trees are actually two to four sprites, depending on the final artwork; there’s also, at least theoretically, multiple sprites that make up grass (flowers or such), and potentially a couple extra sprites that might be necessary for special game states.)
I am almost always in favor of slight intercession over new rules for managing things. Thanks for the instructions on non-scaling things - I was just poking at that piece! I will go and experiment.
Oh yes, you’re perfectly able to specify negative coordinates as well as coordinates that are greater than the canvas dimensions. This is in fact the easiest way to eliminate the borders, and I would encourage you to use it if you can. It will save you a little coding, and a lot of subtraction (needed to move from canvas coordinates to center-offset coordinates in the method I suggested). The main difference between the two is that, at smaller window sizes, Ben’s suggestion will tend to show you more of the boring stuff (sky and ground) while mine is biased toward showing more of the interesting stuff (trees, sun, clouds, etc.) It will depend on the particular implementation which of these is better–my suggested method could cut off important information, whereas Ben’s never cuts anything off.
I really like where you’re going with this, by the way; a creative way to extend what you had been doing with window background colors. The graphics are looking good too.
I think I was sort of thrown by the language - I think of a canvas as a complete piece to paint on, but it doesn’t make much sense to paint on the easel off the canvas (at least if you’re doing a traditional piece!). I guess I sort of knew you could use negative numbers, but I expected that whatever was off-canvas would be sliced off. I’m sure this is in the documentation, which I have actually read a couple times, but it hasn’t been sinking in.
Also, thanks for the kind words. It’s definitely a Process - and basically the most aggressive procrastination tool ever, due to the options and my near total lack of art skills. I’ll post an update once I’ve played with stuff a bit, but an extension of sprites along backdrops that are anchored to meet on a set horizon line seems to be the nicest look.
I’d be happy to pass along whatever code I end up with, maybe with some heavy commenting, but I don’t think I’ll do an official extension, since I’m not sure I want to be responsible for maintenance (nor for making the code vague yet sturdy enough to drop into anyone’s project). I think it would be pretty easy to clean out, though.
All metaphors are imperfect, I guess. I originally referred to the canvas as “the background”, which was not very productive, and I found I had to continually use phrases like “independent scalable coordinate system” and so on–not very user-friendly… After hitting on the canvas metaphor, which points primarily to the scalability (“stretch”) of the canvas, I kind of rationalized the fact that you can have pre- and post-canvas elements with the idea that when you stretch a canvas to a frame, there is canvas (and often paint) on the outside of the frame as well as the inside. Obviously, these days few people but the artist and gallery workers will ever see that, but it’s there… Yeah, like I said, it’s a rationalization.
There’s also the matter of the other “frame” in the extended metaphor, which is the picture frame; i.e., the frame which actually removes screens the edges of the canvas from view. Glimmr has a whole other degree of flexibility there too, which probably violate the metaphor but are very useful–for example, you can change the origin point of the window frame, allowing you to move the frame over the canvas to focus on different areas, etc.