Anchorhead is too hard for me

Let it not be said that I just whine about problems without solving them. I spent a sick day this week converting a 1998 Anchorhead walkthrough into rot13 InvisiClues, and then playing through the 2018 Anchorhead and making separate InvisiClues for that version.

I put them up on IF Archive and added a link to IFDB. ifarchive.org/if-archive/soluti … iclues.zip

I also made a map of the 2018 version. ifarchive.org/if-archive/soluti … 18-map.png

Enjoy!

2 Likes

Having assembled these clues, I still think most of Anchorhead’s puzzles don’t entirely make sense even in hindsight, especially the main puzzle for 80% of the game: “what do I have to do to end the day?”

• Breaking into the real-estate office, surrounded by red-herring puzzles. Why am I doing this?
• Proving that the bum lied about William. Why am I doing this?
• Spying on Michael in the wine cellar. The “correct” hole shows darkness, until randomly it shows what you want to see in the morning of Day 3, and only in the morning)
• Putting the black disk in the rectangular slot in the telescope (the disk isn’t rectangular!)
• Opening the back exit to the sewer
• Finding the hidden entrance to the paper mill
• Returning the bear to get a mill key
• Picking the lock after the ritual (with no training; no other locks in the game are pickable)

Nice! A few corrections and alternate solutions to the 2018 version that you might want to implement:

[spoiler]REAL ESTATE OFFICE

  • You can get Michael to come with you to the real estate office before you get the keys. First, TELL him about the missing real estate agent. Then type MICHAEL, HELP (or some variation thereof, as long as it contains the keyword “help”). Them, when he asks “are you sure,” say YES. Michael will put the library book away, accompany you to the office, provide hints in a couple of places, and even get the keys for you if you lead him all the way to the file room.
  • Michael will also provide you with the name “Verlac” if you ASK HIM ABOUT HIS FAMILY (alternate solution to the answering machine).

BEHIND THE WALLS/PEEPHOLES

  • Your map of the Behind the Walls maze is pretty convoluted. It’s probably easier to visualize like this:
        to 4
           \
            \ ____
             |__2_|       to 1
            /  |   \       /
       ____/  _|__  \____ /
      |__1_|-|__5_|-|__3_|
      /    \   |    /
     /      \ _|__ /
 to Study    |__4_|
		            \
			          \
		   	       to 2
  • The peepholes are in rooms 2, 3, and 4. The ladder is in room 5.
  • The peepholes randomize whenever you move to a new room; not just when you enter the Study. You can just go back and forth between two peepholes and eventually see every scene.
  • Note, it is possible to solve the mural puzzle without using the peepholes at all, if you managed to grab Michael’s faculty card on the second day, and checked out the Monmouth book, and took copious notes.

THE PUZZLE BOX

  • You can smash the puzzle box with the meat hook.
  • You cannot smash the puzzle box by putting it on the train tracks (well, you can, but it will destroy the lens inside as well).

THE DESK KEY

  • You can pick the lock on the real estate agent’s desk drawer with the needle, in case you forget to search the corpse in the church basement.

THE BROKEN STAIRS

  • You can also reach the broken stairs by HOOK/REACH/SNAG/GRAB STAIRS WITH THE UMBRELLA or THE MEAT HOOK.

THE TEDDY BEAR

  • Note that after you hide under the bones, the teddy bear is automatically revealed (though searching the bones before you hide in them will also uncover it).

THE DINGHY

  • HANG LANTERN ON/FROM HOOK also works here (I only mention it because you said the parser was finicky here).
  • You can avoid getting lost at sea indefinitely, as long as you row WEST each time the tide pulls you further out.

FACTORY FLOOR

  • The towel or the robe can also be used to drape over the valve wheel.

THE TOOL POUCH

  • You might want to mention that the tool pouch can contain up to half a dozen small items AND can be worn without attracting attention; this is explicitly intended to ease the otherwise over-strict inventory limit of the end game.

THE MADMAN

  • You don’t mention the madman in your walkthrough. His movements are semi-random, but he will only kill you if you remain on the same room with him for three consecutive turns. It is possible (though unlikely) to run straight for the gate and not have enough time to unlock it before he eats you. You might consider telling your readers that giving the Foot Health magazine to the madman will distract him for several turns; and you can eliminate him entirely by stabbing him with the meat hook or the screwdriver while he’s distracted.

THE MOB IN TOWN SQUARE

  • Although the hidden alleyway gives you the best view and allows you to see the amulet when the old man drops it, you can wait out the mob in the Asylum Courtyard or the Shadowy Corner as well. (The hidden alley connects to the asylum courtyard to the west.) The amulet will be visible in the town square after the mob leaves, even if you didn’t see the old man drop it.
  • For that matter, you can just stay in Town Square the whole time if you’re wearing the robe and not carrying the trenchcoat.

WILLIAM

  • If the player has foolishly discarded the meat hook before encountering William on the bridge, the screwdriver will also do the trick.
    [/spoiler]

I’m interested in your thoughts on the 2018 version; though I gather you were still unsatisfied, several of the changes made were specifically meant to address some (though not all) of your complaints about the original.

2 Likes

Questions to clarify my InvisiClues:

  1. Am I right in understanding that these are the bare minimum requirements for solving the mural?
  • You have to find the mural. (You can find it just by examining the racks and pushing them as early as Day 2, but you can also spy on Michael, and then he’ll reveal the mural and push the racks for you.)
  • You have to read the charts in the Observatory. Only then can you TOUCH the star signs on the mural.
  • You have to determine the combination. This at least requires reading the names of all of the Verlacs in the scrapbook, and then looking up the Verlacs in the Courthouse (that’s the only way to get their birthdates), and it requires the Monmouth page, which you can read on Day 2 by stealing the wallet, or you can find it in the house by spying on Michael. Ideally, it also requires the Croseus chapter from the Frazer (“Overview”) book that Michael checked out, but you can brute force Croseus’ sign if you know all of the rest.

All of that could be done on Day 2 by stealing Michael’s faculty card, but honest spouses can do it on Day 3 by finding Michael’s wallet.

  1. Am I right in remembering that you can smash the puzzle box with the train in 1998 Anchorhead? But that no longer works in 2018 Anchorhead? Similarly, the meat hook didn’t open the box in 1998 Anchorhead, but works in 2018?

  2. Are the office drawer and the shackles the only two pickable locks in this game?

  3. Am I right in remembering that in 1998 Anchorhead, you had to see the the hobo (Dr. Rebis) die in order to get the amulet back, and that means you had to hide in the side alley?

  4. Is it now possible to spy on Michael all day?

Regarding the finicky parser at the Wharf:

Applying the oar to the boat required “PUT THE OAR IN THE OARLOCK” and not not simply “IN THE DINGHY”. “ROW” is synonymous for “GO”, so “ROW DINGHY” doesn’t work. (“You can’t see any such thing.”) If you “ROW” in the tied dinghy at the Wharf, you exit the dinghy. If you “ROW” when Out at Sea (without an object), it doesn’t work unless you’ve put the oar in the oarlock, even if you have both oars.

It’s also easy to accidentally exit the boat by typing “WEST.” If the dinghy is untied when you do that, you lose the dinghy.

Changes I’ll make:

  • I’ll provide a separate map of the Behind the Walls maze. Trizbort doesn’t work well for mapping mazes, it seems.
  • I’ll fix the instructions on smashing the puzzle box, suggesting smashing it with the hook rather than a train.
  • I’ll eliminate the hint mentioning searching the bones, and instead say that you’ll need to open the office drawer before trying te enter the mill. (That will ensure that the player has visited the Church, and therefore visited the well.)

Here are my thoughts on each puzzle I mentioned above.

  1. Throughout, the puzzle “how do I end the day” seems to have no logical answer. It should at the very least link back to each dream at the start of the day, but it doesn’t.

The first night’s dream is about discovering the secret passage and spying on Michael, but you can’t do that until the third day. The second day ends when you solve the hobo/Rebis puzzle, for no clear reason.

The second night’s dream is about discovering the well, which is fine, but then you have to play the flute in the Burial Mound to regain access to the real-estate office via the sewer tunnels; your only lead is the dream line, “Michael’s in the cellar, doing something bad.” Only once you get back to the office do you have a “mission” again, to break into the paper mill.

A) Breaking into the real-estate office. Other than adventure-game logic, there’s nothing in this game that says, “yes, you should break into the real estate office.” Michael recommends waiting. The game never says, “that’s it, you’ve waited log enough.” And there are plenty of other buildings to discover that you can’t break into yet, especially including the Church, the Mill, the Asylum, the Sewers, and the Courthouse.

It is intriguing that Michael will propose breaking in if you ask him for help. IMO the “PERSON, COMMAND” syntax is now so rare in modern games as to be undiscoverable without an ABOUT page recommending using it, but “ASK MICHAEL ABOUT HELP” (or “FOR HELP”) also works. The problem is that this requires guessing that Michael will respond to that topic, when the text never explicitly mentions the word “help.” I think there’s no good reason for players to guess that “help” is a valid topic here. This “guess the topic” puzzle is at least as hard (and at least as unfair) as the puzzle we’re trying to solve in the first place.

B) Proving that Dr. Rebis lied about William. It’s easier to find William’s coffin now (you can just stumble across it), and that’s probably for the best. The problem is, the hobo (Dr. Rebis) is the centerpiece of Day 2; you must solve his puzzle to end the day, and you specifically have to prove to him that you know that William wasn’t buried in the crypt.

But this task is totally non-motivated. Why does my character want to do this? What evidence does the player have that Rebis is essential to end the day? After I find the skull, why am I showing the skull to Rebis? He’s not even mentioned in the first night’s dream. What puzzle am I solving?

In my InvisiClues, I phrased the question, “What should I ask the man in the Vacant Lot about?” This question is totally unnatural; nobody would bother to ask this question if it weren’t right there in the InvisiClues.

Perhaps the thought is, “you should solve him just because he’s there,” but there are a bunch of NPCs on Day 2 that you can’t gainfully interact with yet, including the locals in the pub, the orderly, and the mom in the Shanty Town. Why am I interacting with this guy in particular?

I think the right fix would be to have the key appear in his personal description. At least then the question could be, “How do I get the key from the man in the Vacant Lot?”

C) Spying on Michael. You can’t see Michael open the mural until the third day. Randomizing the spy holes makes this worse, not better. I have to just guess that persistent surveillance will pay off, even if I get unlucky and see a repeat message in the holes (which happens).

IMO, spying on Michael opening the mural should conclude Day 2. That’s what the first night’s dream is about: opening the secret passage and watching Michael.

D) Putting the black disk in the telescope. The “thin, rectangular slot” is for some reason meant to hold a non-rectangular black disk that is only “like a lens.”

E) Finding the hidden entrance to the paper mill. IMO this puzzle is bizarrely harder now in 2018 than it was in 1998. In 1998 the thickets are described like this:

It requires persistent examination to bother examining the thicket, but once you see it, it’s a pretty clear invitation to search.

Here’s the thicket description in 2018:

That doesn’t sound inviting. It forces me to make a huge leap of logic to try searching the thickets.

F) Returning the bear to get a mill key. The houses no longer have visible street numbers, so even if you manage to figure out that the newspaper could lead you to the right house, it requires a huge leap to guess that you should type “knock on #48” here to access the house.

G) Picking locks. The needle itself requires searching the asylum in a stressful “time is of the essence” section, quite possibly under attack from the madman. But once you get it, for some reason you can use it to open the shackles, but not any of the other locks we care about? The asylum gate? The new church padlock? The lighthouse door?

@dfabulich - I wanted to post my sincere appreciation for the work you’ve done here - and to everyone commenting on this thread, in particular to both BadWolf and jbdyer with whom I largely agree. This discussion is exactly what I’ve been looking for.

I’ve been slogging my way through the original Anchorhead for the past two years (off and on, when I can). And I adore the open exploration and even the frustration of wondering “what do I do now?” The uncertainty makes the experience that much more immersive and discovering solutions that much more rewarding. But there are times when I’m so completely stuck that a hint is exactly what I’m looking for - not a walk through which breaks the experience and makes me feel like I’ve given up. (And I should note, I’ve skipped reading the last two posts to avoid getting too many spoilers.)

I’ve dabbled in writing my own IF, and the thoughts laid out here will be extraordinarily helpful in keeping the game play balanced and accessible. So … thanks!

6 Likes

I just completed Anchorhead 1998 and am definitely interested in checking out the 2018 version on Steam.

Not sure Mike is still interested in comments from the original … but I’m going to share them anyway:

  • Like many of the people posting here, I also found myself stuck and needing a walkthrough a few times. It’s too bad that there’s not a “hints” document somewhere that can nudge you in the right direction. Myst/Riven have such pages, and it’s really useful for getting you back on the right track if you get lost.

  • The first hint that I needed: Taking out the skull from William’s coffin.
    This is a testament to Mike’s ability to evoke Lovecraft. I was unable to think about puzzles and games at this point, because I started to gag a little. I had found Dr. Tim and talked to him, but it didn’t occur to me that I should actually root around in William’s coffin for a skull, and then carry it around. Bravo to Mike for causing such a reaction.

  • The second hint I needed: TWIST/TURN SPHERE in the Study. From Michael’s dream: “I don’t know what it opens yet”, which led me to think that the spheres could be removed from the fireplace somehow. As was the case with the Poe book and safe, I assumed that there would be a way to remove the glass spheres from the fireplace. I guess this is a warning for beginner IF enthusiasts to not let your assumptions get the best of you.

  • The third hint I needed: 4-Digit code. This one was VERY frustrating, because engraving your wedding date on a ring isn’t something that all married couples do. My wife and I have engravings in our rings, but they’re not the date.
    Because day 2 is spent mostly prowling around town and learning about the mystery, I spent a lot of time trying to find a four-digit code anywhere, assuming that it would be a code that Michael saw someplace in town the day before (like at the Library, or maybe somewhere else in the University … maybe even the Real Estate agent). Then I went through the house multiple times. I finally had to give up and resort to the walkthrough. Even my WIFE thought this was an unfair puzzle, and she could mostly care less about games like this.

  • The fourth hint I needed: Someone else mentioned it already, but I also got tripped up by the “circular disk going into the square slot” with the telescope. That was not intuitive at all. Also, I think this was kind of a weak way to get the name of the Great Old One into the player’s hands. This one didn’t make me as mad as the 4-digit code, but it was still somewhat annoying.

  • Fifth hint: I got tripped up by the wedding ring at the end. Edward indicated in his “asylum journal” that Croseus couldn’t bear to be around the amulet: “The old man cannot abide its presence, and must flee all who wear it”. I had originally showed it to Michael during the “mirror sequence” at the top of the Lighthouse, and he smacked it away, hissing. I took from that that I was safe from harm as long as I was wearing it. So I made sure NOT to show it to Michael when the mirror was switched out, and made sure I was wearing it when I touched the obelisk. And it didn’t matter – Michael strangled me anyway. I got completely hung up on this – what other items did I need to have or use in order to get the amulet’s power to work? It never occurred to me that I should just show the ring to Michael. I mean, if the amulet didn’t work, then why would the ring work?

I’m tempted to write my own hint-based walkthrough, but I’m not sure I want to commit to that kind of time sink. Maybe I should just play more IF!

A few other comments following the finish of the game:

  • Who was the Proprietor of the Cauldron?
  • Was the Librarian a different race than human?
  • I had to rerun the “Mill Sequence” several times at the end of Day 2 in order to get Michael into the Lighthouse. What was the exact thing I needed?
  • I had to map out the entire Narrow Corridor Maze to find the Observatory, but mapping out the Mill floor maze was completely useless. VERY frustrating!

Overall, I really enjoyed it. I’m a big fan of Lovecraft, and Mike really captured the mood and horror of the Cthulhu “style”. There were just a few frustrating moments, and I just don’t have the patience to spend days backtracking and replaying sequences. When there’s walkthroughs around, it’s just too easy to look up a clue that puts you back on the right track.

Also – kudos for slipping in that reference to “The Dunwich Horror”. I laughed out loud the first time I crossed the bridge.

Thanks Mike for writing Anchorhead – I realize these undertakings are a labor of love. I hope to play (read?) more of your interactive fiction in the future.

4 Likes

I notice that you are very good at writing hints. Thank you!

I personally prefer hint in the classic InvisiClues-format that Infocom used (a file playable in an z-interpreter). Would you mind if I eventually converted your Rot13-file to this format?

Have you ever contemplated writing hints for Curses! (something I think is sorely missid)? I have a file with a lot of information for dissassembly (and the two walkthroughs) from when I played this winter if you’re interested. It contains, for example

  • All the answers from the Angel and the Demon (and which object the answer relates to),.
  • A complete score rundown. The max score is 554, I think, due to a bug that score the same object twice.

I’ve actually never played Curses!

Most of the invisiclues I’ve written recently have been here on the forum using spoiler text (like this). I might redo the Anchorhead ones in that format in the future.

I’m not a fan of the Z-machine menus. They’re way better than nothing, but it sucks that you can’t click on them.

2 Likes

I can really recommend Curses! It was a great game but huge and difficult at places. Its a shame that there is no invisiclues or hints because the walkthroughs can spoil too much.

Well, maybe a project for at a later date…

I think I have a real problem with linear bottlenecks in games with a vast amount of (currently accessible) locations.

Things like “you have to do x” to be able to progress, because “X” is required for some narrative purpose, and until that area of the narrative is uncovered, then everything else is blocked, often for completely arbitrary reasons.

Now if “X” is clearly signposted, like, “gain access to a cave”, get money for the bus, and if you have several ways to discover your current goal, then it’s exponentially less annoying.

It’s even less satisfying when the game isn’t waiting for a creative act (such as figuring how to solve a puzzle), but waiting for something silly (talking to the landlord of a pub a second time).

The game is essentially paused pending a mind-read of the author.

I find that the most interesting games are one with:

  • A small pregame
  • Distinct phases, with multiple puzzles that can be solved at any one time.

A good indicator of if your game is going to frustrate the player is if the puzzle dependency chart is mostly a linear straight line from top to bottom.

I think that Ron Gilbert’s blog on puzzle dependency charts puts it better than I possibly could:

6 Likes

I think the puzzles in Anchorhead are well-calibrated. This, coupled to a very well written story, makes Anchorhead a gem of Interactive Fiction.
Many years ago I played the 1998 version. I just finished the 2017 version, enjoying it even more.
If it may help someone, here’s a walkthrough for it, complete with a scan of the map I drew while playing: https://dr0.ch/if-anchorhead/

5 Likes

Great walkthrough! This will come in handy when I replay Anchorhead in the Illustrated version. Thanks.

1 Like

Thank you. I’ve tried to add all actions that, although unnecessary to finish the game, give a broader sense of understanding of what’s happening in Anchorhead. (For instance the fate of the husband of the woman that lives in the shanty town.)

3 Likes

The CAAD spanish if community have a comunitary game on fridays at night. We have been playing A N C H O R H E A D for about 8 weeks.
We have ended up with 99 points.
I can say this GAME, in capitals, is amazing, one of the best in if world.

Best regards.

3 Likes

As some of y’all might have noticed, I finally went back and converted my rot13 Anchorhead Invisiclues to a clickable version here on the forum: Anchorhead (2018) Invisiclues Hints

I was struck by @adventuron’s point about puzzle dependency charts, so I tried making one for Anchorhead 2018.

  1. End Day 1
    1. Follow Michael
      1. Bring him the keys
  2. End Day 2
    1. Give hobo the amulet
      1. Find the curiosity shop
      2. Show hobo the skull
        1. Bring him the flask
        2. Enter the crypt
          1. Find/sweep the webs
            1. Enter the Storage Room (flashlight)
  3. End Day 3
    1. Escape Mill
      1. Enter Mill
        1. Row to mill key
          1. Give bear to Mrs. Greer
            1. Find Mrs. Greer (can be done on Day 2)
            2. Get to shanty town
              1. Play flute in Burial Mound
                1. Use password to enter Burial Mound
                  1. Use telescope
                    1. Open puzzle box (can be done on Day 2)
                      1. Open safe
                        1. Find safe
                        2. Use Michael’s laptop
                  2. Solve mural (can be done on Day 2)
                    1. Find mural
                    2. Find mural combination
                      1. Spy on Michael (or his library books)
            3. Escape Forest Lane/Church
              1. Find/Escape slaughterhouse
  4. Last Night
    1. Defeat Croseus
      1. Chase Michael
        1. Escape island
          1. Find/Bring needle
          2. Give flawed crystal
            1. Smash copy crystal (can be done on Day 2)
              1. Find copy crystal
            2. Enter lighthouse
              1. Get past William
                1. Find locket (can be done on Day 2)
                  1. Find attic key
                2. Get past mob
                  1. Escape asylum
                    1. Find your stuff
                      1. Escape jacket
                        1. Escape cell

Even without revealing the spoiler blur, you can visually see that this chart is, as Chris pointed out, almost completely linear. For most of the game, there is at most one thing that you can work on at any given time. There are just a handful of puzzles that can be worked on in parallel or out of sequence.

By contrast, look at the map of Anchorhead: it’s an enormous sprawling place. A map like this invites you to try to solve multiple puzzles at once. Did you get stuck trying to enter the real-estate office? Maybe you should try entering the Church or the Mill while you think about it.

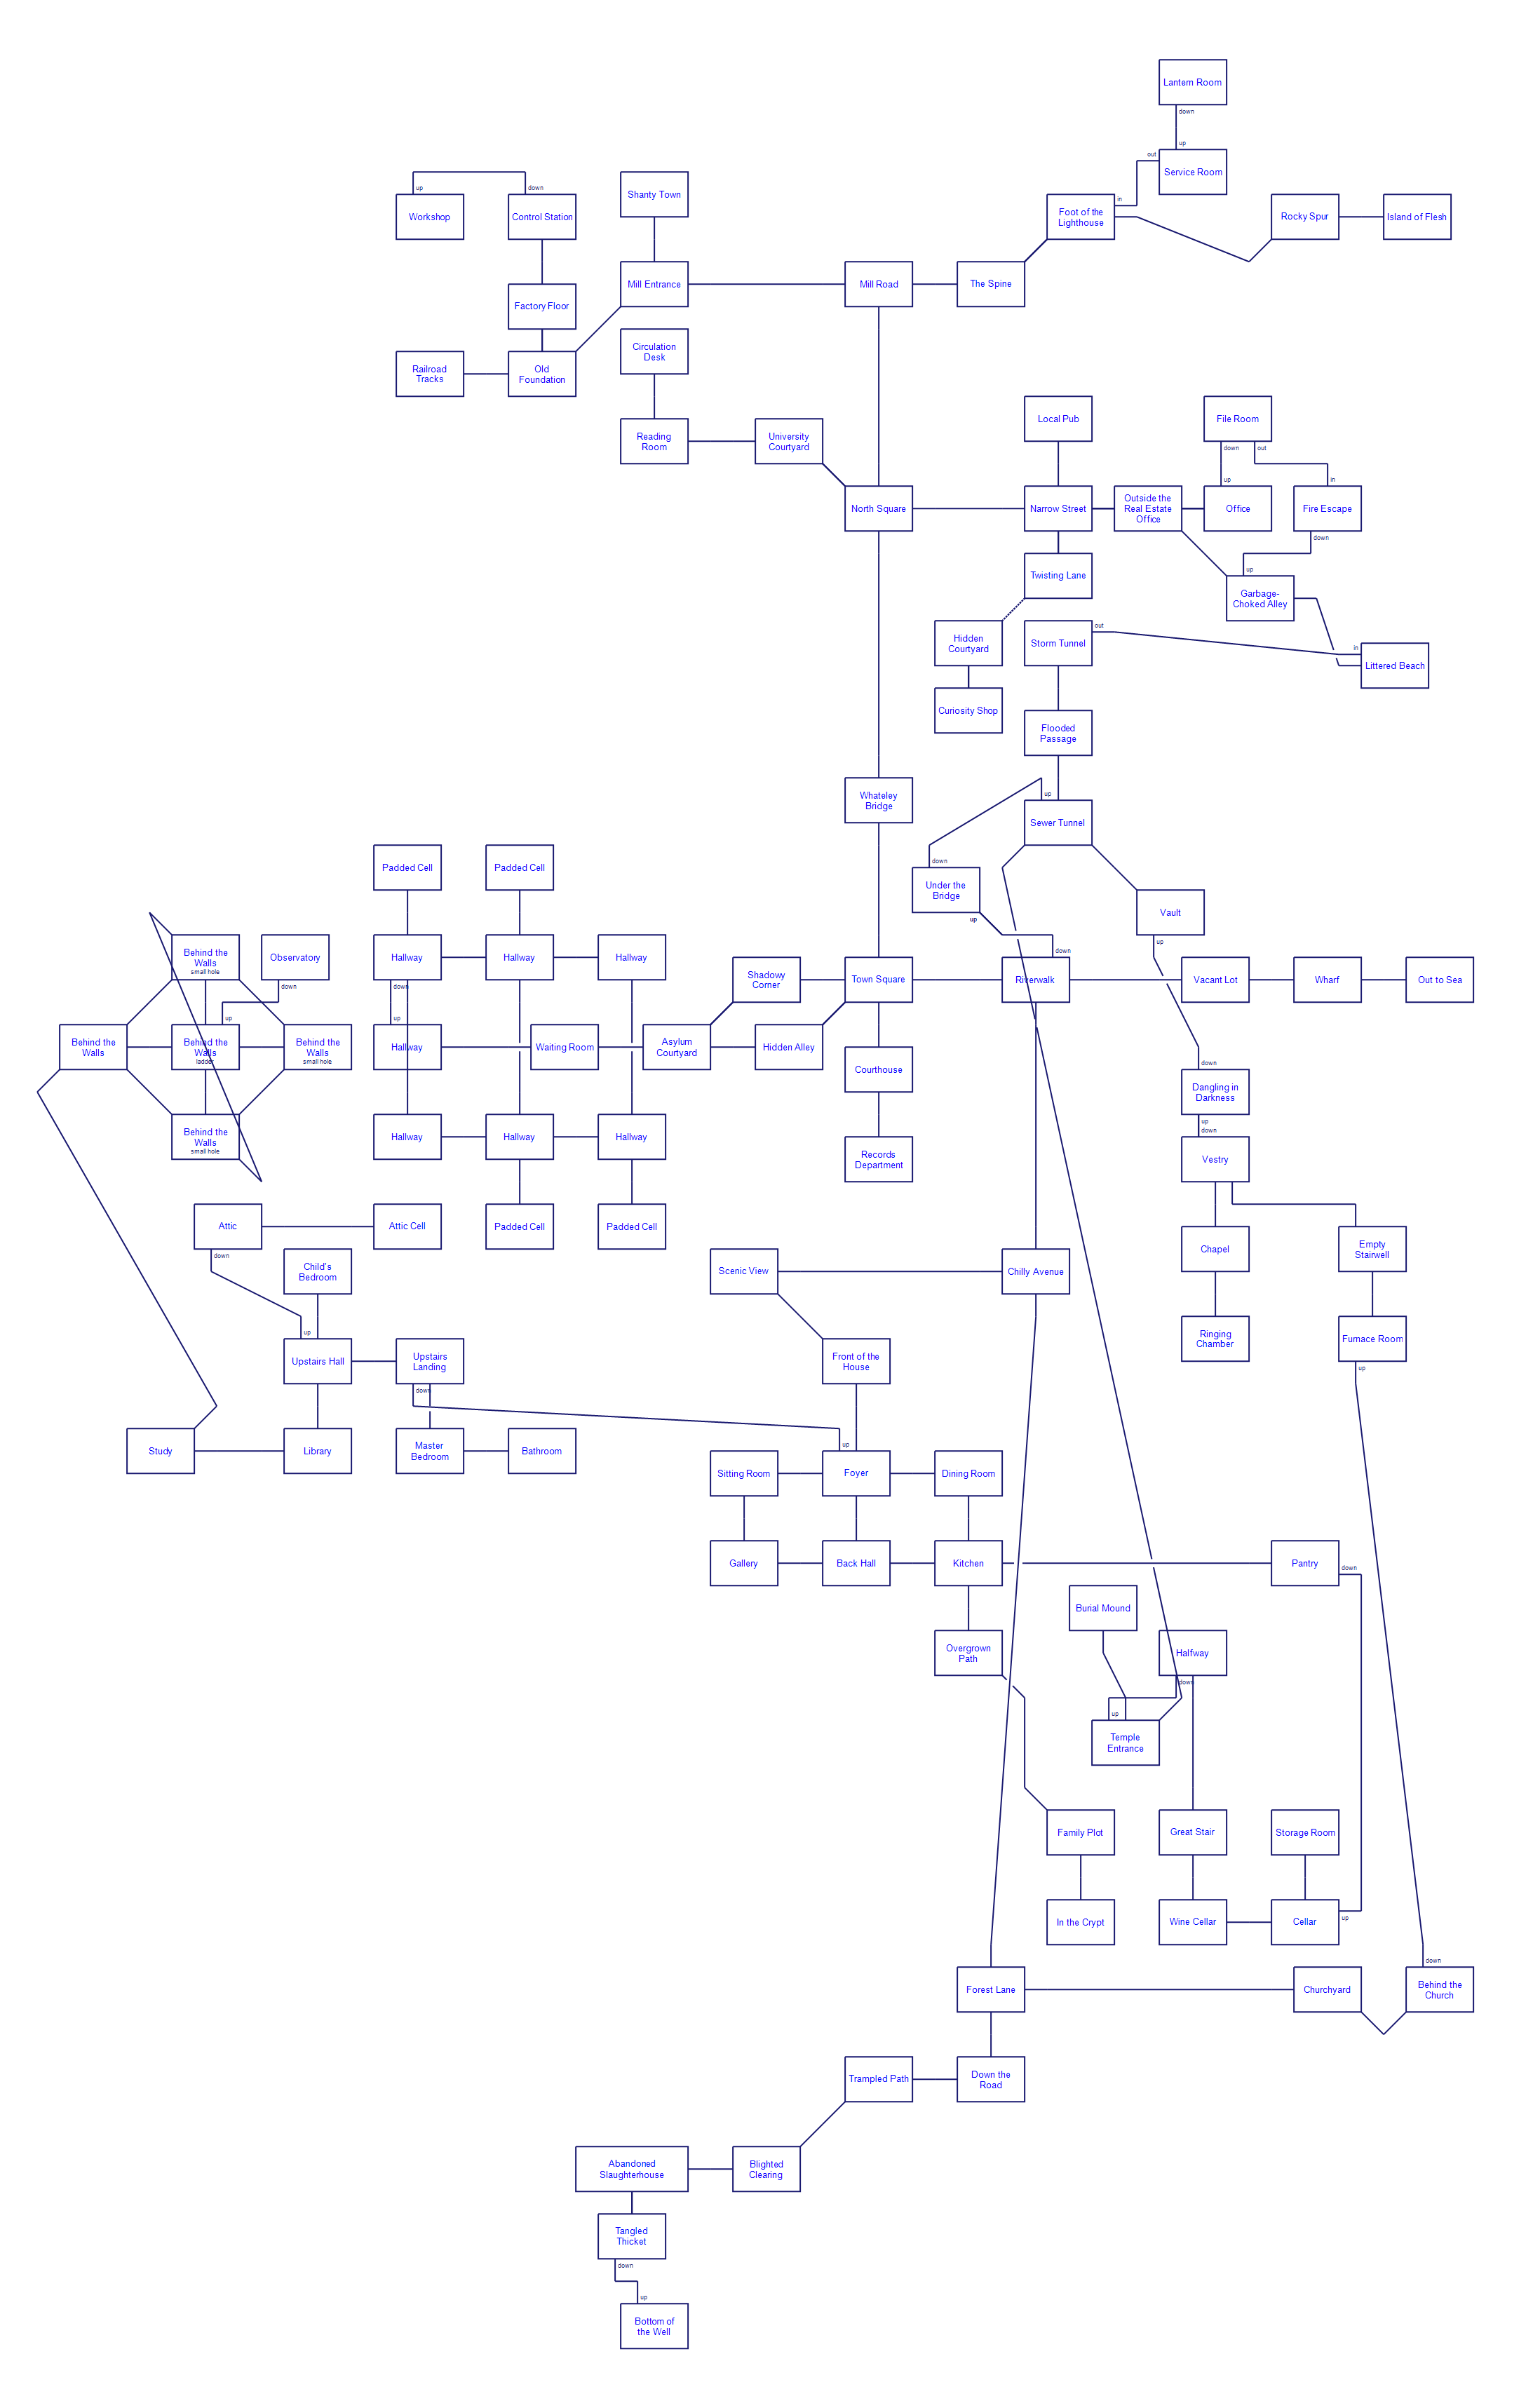
This mismatch is a bad thing, IMO, because it means that the vast majority of Anchorhead’s map is irrelevant to the problem you’re solving right now. On Day 1, you simply can’t enter the Church or the Mill, at all. The result is a game where you can never develop trust that you’re working on a puzzle that can be solved right now. Why am I solving a puzzle with the hobo in the Vacant Lot on Day 2? Why him and not Mrs. Greer, or the orderly, or the telescope?

When it turns out that you can’t solve a particular puzzle on a particular day, (e.g. the telescope puzzle on Day 2,) you never say, “ah, of course, I should have known that this puzzle wasn’t ready yet, in hindsight,” but always “I had no way of knowing that this puzzle couldn’t be solved yet.” All of the puzzles look solvable, but only one or two of them are; there’s no fair way to know which ones are which, and that makes the game frustrating, even when you find out the right answer.

The moral I draw from this is that games with big maps should have wide, branchy puzzle dependency charts, or else should have a clear in-game guide telling you “you can solve puzzle X now. It may seem hard, but trust me, if you think about it, you’ll get it.”

And that’s what my Invisiclues are intended to provide. You’re not supposed to read them like a walkthrough, but maybe just read “How do I finish Day 2?” which tells you which puzzles need solving, but not how to solve them. (Of course, if you need that, too, the solutions are also available.)

6 Likes

I think that the invisiclues and dependency chart you created are very helpful, and I think in a way they show me a different moral than the one you found. Looking back at old usenet discussion of games like the ones mentioned earlier in the thread, it seems like a big part of the appeal of open-world games is that there spurts up this community that discusses them and trades hints about them online when someone is especially stuck.

So I’m not sure that ‘open-world game with tons of open problems should be designed with broad puzzles or embedded hints’ is the lesson, necessarily, because the need for such things can spur social discussion of the game, like it has here.

It’s even true for non-puzzle games. Sometimes it feels like half of the CoG forums are people asking how to romance characters in the games, leading to invisiclue hints and discussion there.

2 Likes

I think social discussion is just a feature of big games with lots of puzzles. By contrast, Hadean Lands had a very healthy discussion section, but its puzzle dependency chart is much wider. In HL, if you’re stuck on a puzzle, there probably is another puzzle you can go work on in the meantime.

1 Like

Some great discussion here!

I made an Anchorhead map while playing it recently. To me it really helps to try to get a sense of geography while playing, so that’s what I tried to convey. (Thanks for the discussion about the Behind the Walls maze earlier, I basically stole that wholesale…)

It’s a bit of a WIP, not sure if all the colors work or if I should just throw those out, but the main thing I tried to do was put the rooms in logical physical relation to each other (especially, of course, the underground locations), with some minor concessions so Trizbort would make pretty lines.

6 Likes

That map is fantastic! Also the first map or walkthrough (that I’ve seen) that gets the behind-the-walls maze right.

3 Likes

@mikegentry Thanks!! But I can’t take full credit for the Walls part, I based it on the topology in the map @dfabulich linked to (although it was missing directionality and one passage).

I’m kinda proud of the rest of the layout though; took a bit of Trizbort wrangling to get the Scenic View to match up with what the game says you see there, to line up the underground rooms with the rest of the world, etc.

Edit: By the way, it’d be great to see any maps you made while designing the game!

2 Likes