Bisquixe is an Inform extension and interpreter that can easily style the colors and fonts of Inform games in the Glulx format released with a website. It was created by Brian Rushton (@mathbrush). The interpreter is extended from Quixe by Andrew Plotkin (@zarf).
Contents
Part I - Guide
- Setup
- Formatting basics
- Three areas of text
- Status line colors
- Main game colors
- Input colors
- Fonts for the status line and main game
- Custom styles for individual words and phrases
- Fully modifying the status line
- A one-column template
- Releasing your Bisquixe game
- Conclusion
Part II - Cookbook
13. Styling room headers
14. Gradients and background images
15. Hide the scrollbar
16. Hide the status line
17. Increase the padding around the game text
18. Retro computer theme
19. AGT colors
20. Text messaging theme
21. Game in a bubble (TV theme)
22. Additional documentation and further Bisquixe capabilities
23. Usage and guide version
Part I - Guide
1. Setup
To get started with Bisquixe, download it from its Github page. There are two parts: Bisquixe (the interpreter) and the Simple Multimedia Effects extension. You’ll need both. (Choose the correct extension for your version of Inform. This guide will use Inform 10 and assume we’re developing for a desktop website.)
To install the extension, choose File → Install Extension from Inform’s main menu. Bisquixe requires the Glulx Entry Points extension by Emily Short. It should automatically be installed in Inform 10.
To install Bisquixe, copy the Bisquixe folder into the Templates folder of Inform. (On a Mac, this may be ~/Library/Inform/Templates. In Windows, it may be \Documents\Inform\Templates). Alternatively, you can copy it into a Templates folder you create in the .materials folder of the project in which you plan on using Bisquixe.
Once you have everything installed, to use Bisquixe in a project, you’ll need to include these two lines:
Release along with a "Bisquixe" interpreter.

Include Simple Multimedia Effects For V10 by Mathbrush.
Here’s some starter code we’ll use to develop our examples:
"Alien Invasion" by "Biscuit Quick"

Part - Setup

Release along with a "Bisquixe" interpreter.

Include Simple Multimedia Effects For V10 by Mathbrush.

Part - When play begins

When play begins:
	say "Welcome to Alien Invasion!"

Part - Lab

Lab is a room.  "You're in a high-tech lab."

The newspaper is in the lab.  The description of the newspaper is "The headline reads: ALIENS INVADE EARTH!".

Part - Containment Facility

Containment Facility is north of Lab.  "You're in a high-tech alien containment facility."

The alien is in the Containment Facility.  The description of the alien is "You can hear the alien say to you in your mind, 'We come to Earth in peace.'"
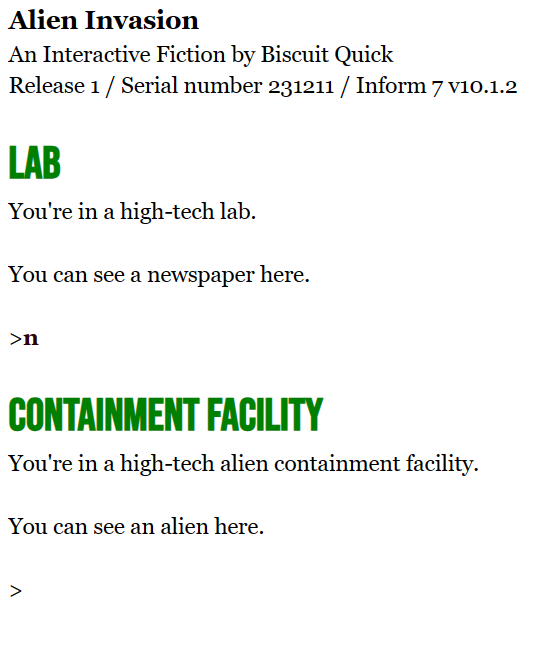
Try installing Bisquixe and then Releasing this example. Everything should compile, and you should see the Release subfolder in the .materials folder of your project. Open the Release folder, and then open the play.html file in a web browser. Nothing has happened yet beyond generating a standard Quixe website. Soon, we’ll be making that experience look much different through special commands in Inform!
An important note: these formatting changes will only apply to the website that’s generated. It is recommended practice for playability and accessibility purposes to also provide a download of the .gblorb game file for play in an offline interpreter.
2. Formatting basics
When releasing a project, Bisquixe automatically generates a website. We can change the look of the website through special commands in Inform using the Simple Multimedia Effects extension.
Modern web pages are styled through CSS (cascading style sheets). To change the styling of anything on a web page, we need to know three things: the element to change, its particular property to change, and the value to set the property to.
With Bisquixe, the most common command to style a webpage will be:
css-set-fast "[element]; [property]; [value]".
Most commonly, this command will be placed in a “When play begins:” block.
3. Three areas of text
The web page generated by Bisquixe has three main areas of text we can style. They are the status line at the top, the main game window, and then the inputs from the player. Each one has a CSS name that we’ll need to repeatedly use in order to style things correctly.
| Area | CSS Name(s) |
|---|---|
| Status line | .GridWindow |
| Game area | .BufferWindow |
| Player input | .Input / .Input.LineInput / .Style_input |
4. Status line colors
So let’s get started! We’ll begin by changing the background and text colors of the status line.
In the “When play begins” block of the starter code, add the following command (with appropriate indentation):
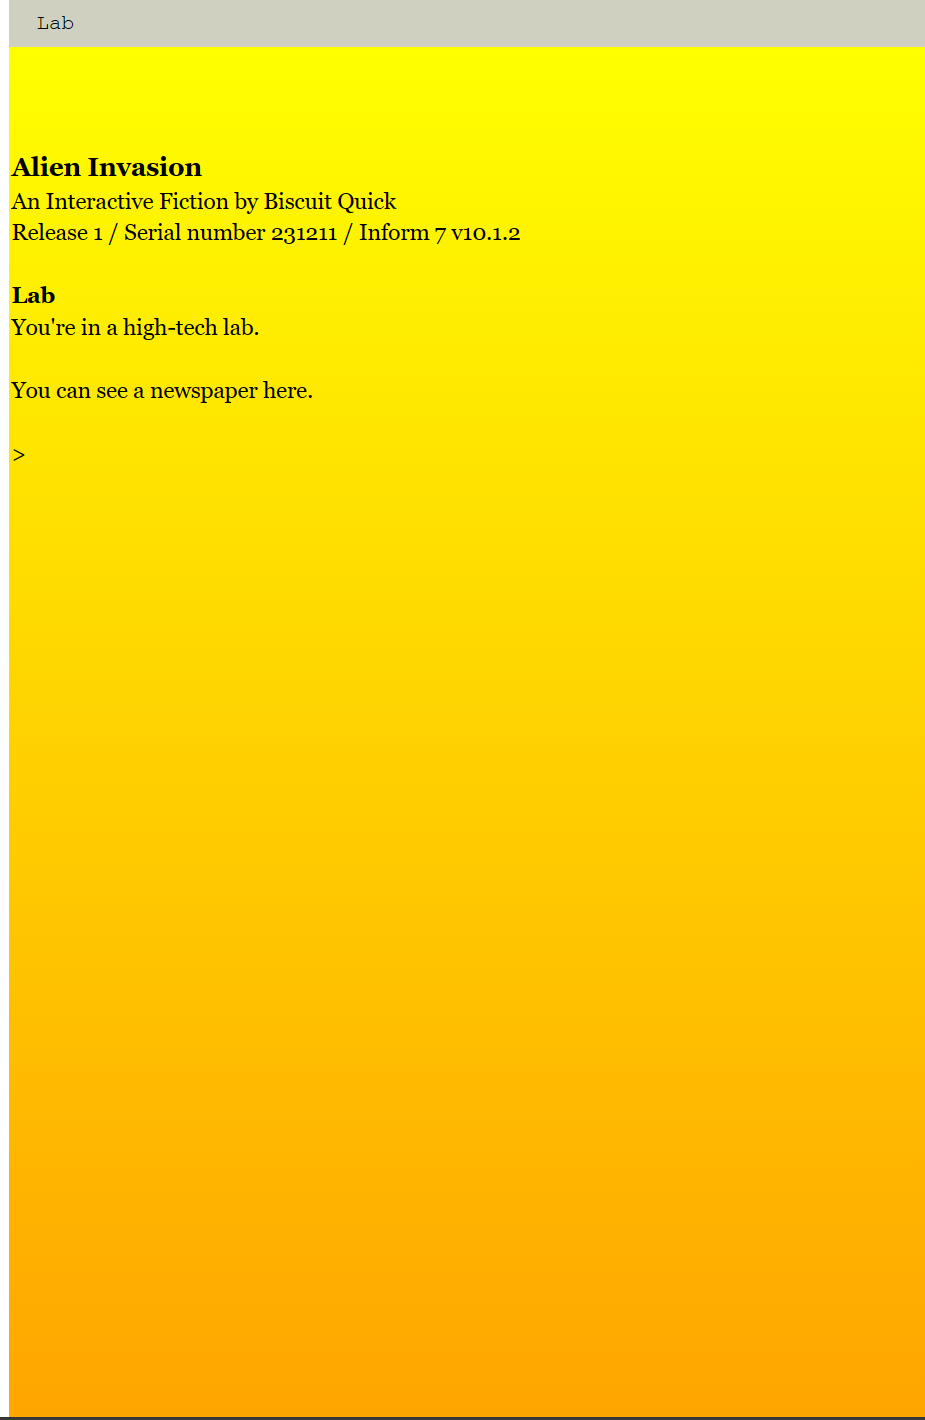
css-set-fast ".GridWindow; background; orange";
This command says we should change something in the status line (.GridWindow). We’re going to change the background color, and we’ll make that background orange.
Then, let’s change the text color, too. Add this command underneath the one you just added:
css-set-fast ".GridWindow; color; purple";
This time, we’re setting the “color” of the status line, which is shorthand for the text color. It will be purple.
So, your new “When play begins” block should look like this:
When play begins:
	say "Welcome to Alien Invasion!";
	css-set-fast ".GridWindow; background; orange"; [make the status line background orange]
	css-set-fast ".GridWindow; color; purple"; [make the status line text color purple]
Go ahead and Release this project. It should compile cleanly. Again open the play.html file (located in Alien Invasion.materials / Release) in a browser. It should look like this:
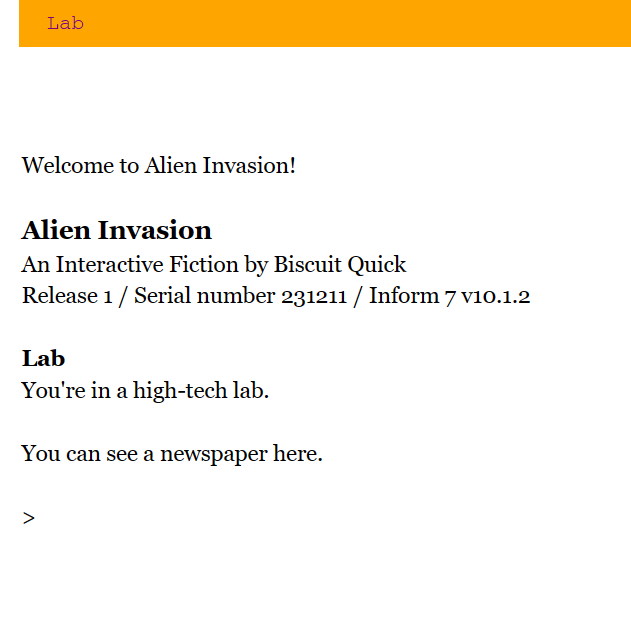
Looking great so far!
If your webpage doesn’t look like the above, be sure you’ve entered the above code correctly, including punctuation. You will not get an error message on the webpage if anything is wrong; the CSS code simply won’t do anything. In particular, be sure you’ve added the initial dot in “.GridWindow”. Be sure you have the hyphens in “css-set-fast”. Be sure the three elements in “.GridWindow; background; purple” are separated by semicolons, not commas. And be sure the quotation marks are located correctly.
In CSS, you can refer to colors in two ways. The first is to use a common name like “purple”. There are 140 total such color names including ununusal ones such as “PapayaWhip” and “CadetBlue”.
You can also use a hex code. Hex codes are six-digit codes (with digits running from 0-F) preceded by a pound sign. These codes allow for more nuanced color choices, and can be chosen through a color picker such as this one.
We’ll use #F3E8ED, a very light pink, in our next example.
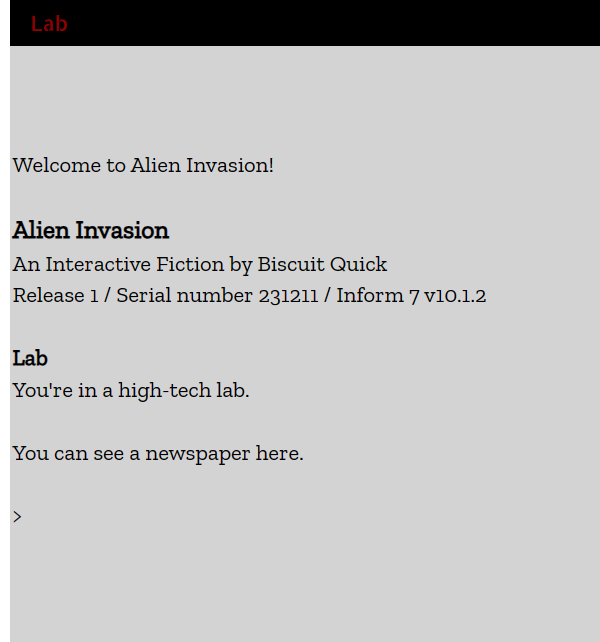
5. Main game colors
Here we’ll change the background color and the text color of the main game area, which is referred to as “.BufferWindow”. Let’s use a light pink background (given as a hex code) with the text in blue.
Add this code to continue on with your “When play begins” block:
css-set-fast ".BufferWindow; background; #F3E8ED"; [hex code for light pink]
css-set-fast ".BufferWindow; color; blue"; [make the main game text color blue]
After Releasing, this is how your play.html should look now:

Attractive!
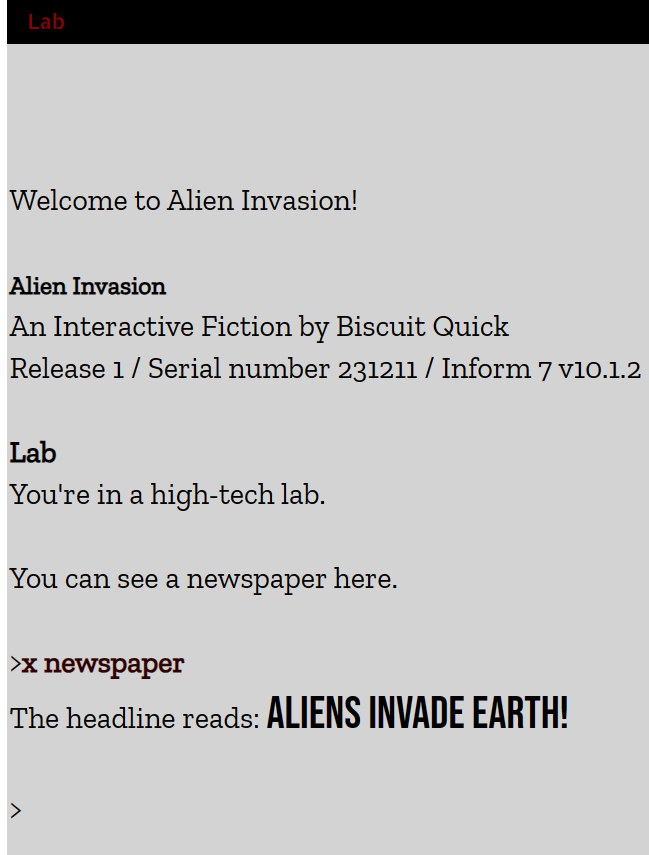
6. Input colors
Styling the player input is slightly more complicated. There are several elements we can adjust. First, let’s change the color of the text as the player types it in. That’s controlled by “.Input”. Let’s make it red. Continuing with our “When play begins” block, add:
css-set-fast ".Input; color; red"; [make the player input red]
You might notice that after submitting a command and hitting Enter, the command then turns another color. To set that color, we need “.Style_input”. Let’s try a dark green. To your code, add:
css-set-fast ".Style_input; color; darkgreen"; [make the submitted output dark green]
The total result should look like this:

Beautiful! The final “When play begins” code is:
When play begins:
	say "Welcome to Alien Invasion!";
	css-set-fast ".GridWindow; background; orange"; [make the status line background orange]
	css-set-fast ".GridWindow; color; purple"; [make the status line text color purple]
	css-set-fast ".BufferWindow; background; #F3E8ED"; [hex code for light pink]
	css-set-fast ".BufferWindow; color; blue"; [make the main game text color blue]
	css-set-fast ".Input; color; red"; [make the player input red]
	css-set-fast ".Style_input; color; darkgreen"; [make the submitted output dark green]
7. Fonts for the status line and main game
Fonts on the web work slightly differently than colors. One cannot assume that one user has the same fonts installed on their computer as another. In fact, there are relatively few fonts that are assumed to work across every operating system and every browser.
However, better typography is possible, and Bisquixe makes this possible through the use of Google Fonts. Google Fonts are hosted by Google and loaded into the browser as needed.
Extensive use of Google Fonts is beyond the scope of this guide. But, in brief: Choose a font. There may be multiple weights and versions. On a font’s page, click the “Select [this font]” link on the right side of the screen to add it to your bag. Then click on the bag in the upper right part of the screen. You should see a list of the fonts you’ve chosen. Importantly, in the “Use on the web” section of the sidebar, choose the @import option. That will provide a link that looks like the below. You’ll need some info from that link to paste into Inform.
@import url('https://fonts.googleapis.com/css2?family=Allerta+Stencil&family=Bebas+Neue&family=Zilla+Slab&display=swap');
Bisquixe offers a new command for handling Google fonts:
import-google-fonts "[list of fonts formatted by the @import url]";
To use this command, we only need the URL text after the first “family=” and before “&display=”
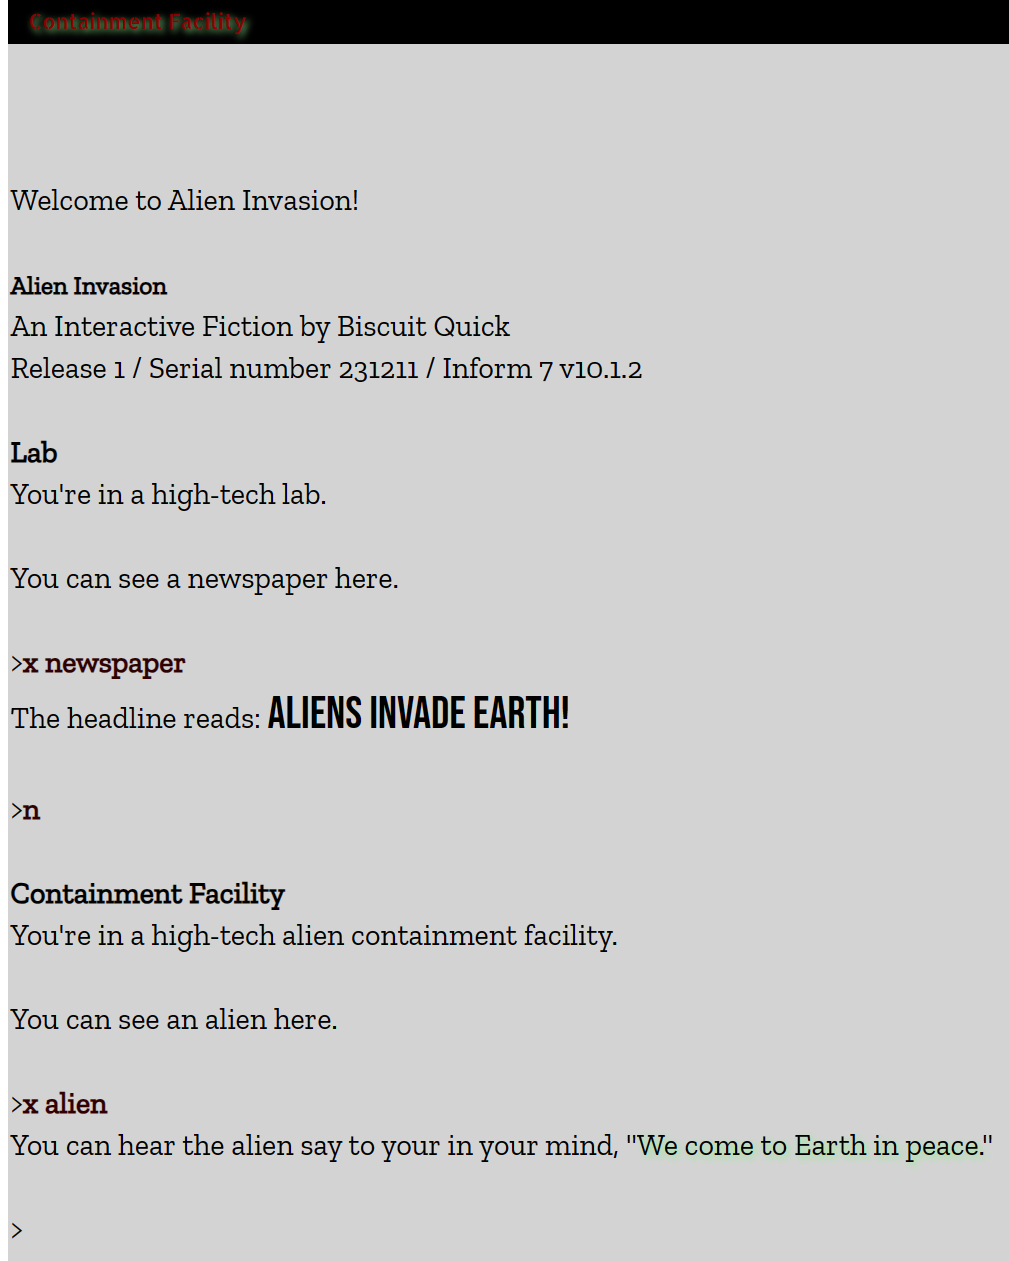
But first! Let’s think about designing our alien game slightly more attractively. Let’s give it a bit more of a cohesive, top-secret theme. That probably means some grays, and maybe a red “top-secret” color and font for the status bar.
Let’s start afresh with the base code. We’ll apply colors first. Remember that “.GridWindow” is the status line and “.BufferWindow” is the main game area. Replace the “When play begins” block with this:
When play begins:
	say "Welcome to Alien Invasion!";
	css-set-fast ".GridWindow; background; black";
	css-set-fast ".GridWindow; color; darkred";
	css-set-fast ".BufferWindow; background; lightgray";
We’re going to add three Google fonts to our game: a stencil font for our top-secret status bar (Allerta Stencil), a headline font (Bebas Neue), and a font for most of the game copy (Zilla Slab). The above @import statement lists those three fonts. To import them into our game, we need our new command. Add this to “When play begins”:
import-google-fonts "Allerta+Stencil&family=Bebas+Neue&family=Zilla+Slab";
(Note that this string has a maximum length of 64 characters. You should be able to import three multi-word fonts, or perhaps four fonts if their names are all short.)
And now let’s set some fonts! Here, we need to set the “font-family” property. We’ll change the status line to the stencil font, and the main game font to Zilla Slab. Notice that we can just type in the font names as words or phrases; we don’t need “family=” or the plus signs here. It is also considered best practice to give one or more fallback fonts in case your desired font does not load. Those come at the end of a list. To keep this simple, we’ll use “monospace” for the status line, “serif” for the game text, and “sans-serif” for a special headline font we’ll create later. Add this:
	css-set-fast ".GridWindow; font-family; Allerta Stencil, monospace";
	css-set-fast ".BufferWindow; font-family; Zilla Slab, serif";
Try it out! It should look like this:
I think both fonts are a little small. We’ll modify the status line further in a later section, but for now, let’s make the game text larger. We can use the “font-size” property:
css-set-fast ".BufferWindow; font-size; 20px";
We’ve increased the main text size to twenty pixels, and I think it reads a little more clearly. You can experiment with different numbers, but be sure there is no space between the number (“20”) and the abbreviation (“px”).
Most games have the font for the player input match the game’s main body font, so that’s what we’ll do here. We’ll have to set the font of the line where the player types slightly differently—we’ll use “.Input.LineInput”. We’ll also need to change that to a size of twenty pixels, as that’s how we’ve set the game’s primary font. Then we’ll also need to set the font that is used when the player presses Enter and the command becomes part of the transcript (again, we use “.Style_input” for that).
css-set-fast ".Input.LineInput; font-family; Zilla Slab, serif";
css-set-fast ".Input.LineInput; font-size; 20px";
css-set-fast ".Style_input; font-family; Zilla Slab, serif";
Release the project and test it out. The input should now match with the rest of the body text.
8. Custom styles for individual words and phrases
But perhaps you don’t wish to style all of the game’s text, or you would rather use stylings for certain events, such as displaying a newspaper headline or speaking with a certain character. That’s where custom styles are a nifty addition.
Once defined, custom styles can be used much like Inform’s built-in [italic type] and [bold type].
Let’s begin by having our newspaper use a unique font! You can name your custom style whatever you want; we’ll call ours “headline”. The element we’ll be styling will then be called “.Style_headline”. We’ll assign it a font (which we previously imported) and also make it bigger than normal.
css-set-fast ".Style_headline; font-family; Bebas Neue, sans-serif";
css-set-fast ".Style_headline; font-size; 30px";
Then, we’ll need to add some new code to give us access to our style. We need a new Bisquixe command: “set-any-class”. Put this as a new block in Part – Setup:
To say headline type:
	set-any-class "headline".
Now we can edit the newspaper headline to reflect our new style. We’ll use [headline type] to turn it on and [roman type] to turn it off.
The description of the newspaper is "The headline reads: [headline type]ALIENS INVADE EARTH![roman type]".
Try it out! Run the game, and X NEWSPAPER. You should see:
Ooh, I really like that. I think it works well, especially if we envision having a game with multiple news headlines.
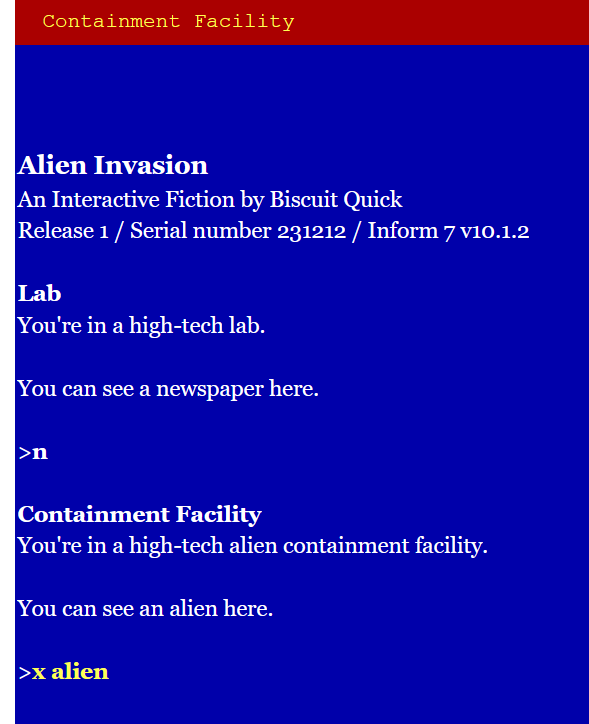
Why don’t we make our alien a little more spacy, too. Let’s give our alien a weird green shadow around all of its thoughts. We call our style “.Style_alien” and we’ll use a new property called “text-shadow”:
css-set-fast ".Style_alien; text-shadow; 2px 2px 5px lightgreen";
The various "2px"s help define the spacing of the shadow in pixels.
We’ll need to add this in Part – Setup:
To say alien type:
	set-any-class "alien".
Then you can edit our alien’s thoughts to include our new “alien type”:
The description of the alien is "You can hear the alien say to you in your mind, '[alien type]We come to Earth in peace[roman type].'"
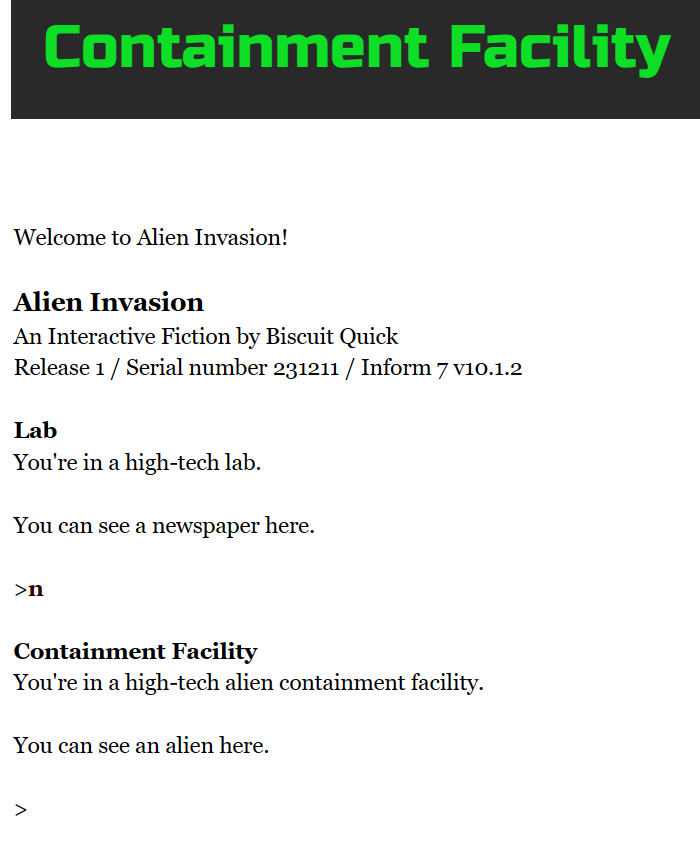
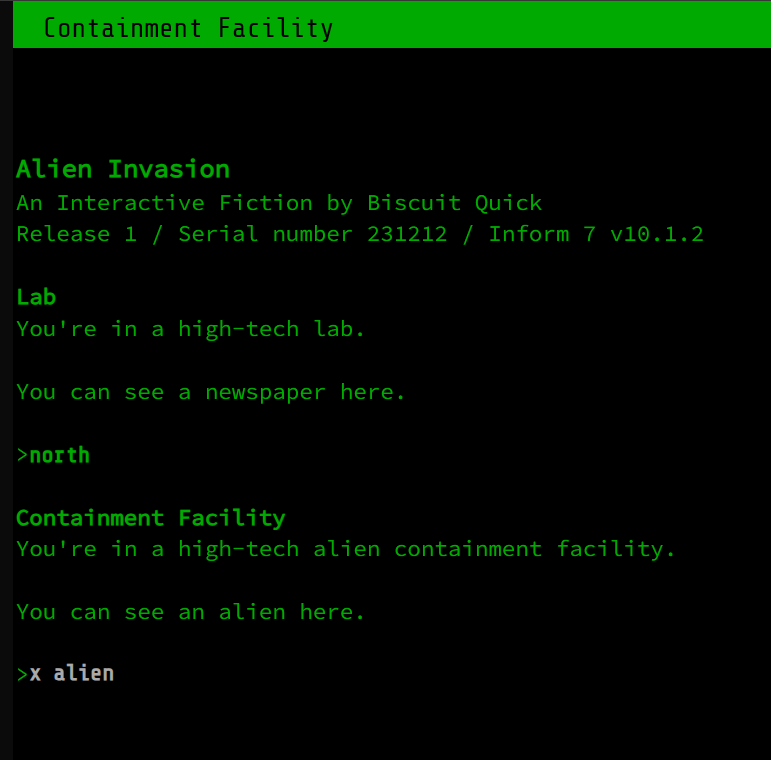
Try it out with N / X ALIEN. Spooky! And if we really want to be spooky, why don’t we use that style up in the status line as well. In our “When play begins” block, let’s edit the status line with our new style:
now the left hand status line is "[alien type][location of the player][roman type]";
Put it all together, and what have you got?
Beauty. That’s what you have, my friend: beauty.
Here’s the complete code for this formatting:
"Alien Invasion" by "Biscuit Quick"

Part - Setup

Release along with a "Bisquixe" interpreter.

Include Simple Multimedia Effects For V10 by Mathbrush.

To say headline type:
	set-any-class "headline".

To say alien type:
	set-any-class "alien".

Part - When play begins

When play begins:
	say "Welcome to Alien Invasion!";
	css-set-fast ".GridWindow; background; black";
	css-set-fast ".GridWindow; color; darkred";
	css-set-fast ".BufferWindow; background; lightgray";
	import-google-fonts "Allerta+Stencil&family=Bebas+Neue&family=Zilla+Slab";
	css-set-fast ".GridWindow; font-family; Allerta Stencil, monospace";
	css-set-fast ".BufferWindow; font-family; Zilla Slab, serif";
	css-set-fast ".BufferWindow; font-size; 20px";
	css-set-fast ".Input.LineInput; font-family; Zilla Slab, serif";
	css-set-fast ".Input.LineInput; font-size; 20px";
	css-set-fast ".Style_input; font-family; Zilla Slab, serif";
	css-set-fast ".Style_headline; font-family; Bebas Neue, sans-serif";
	css-set-fast ".Style_headline; font-size; 30px";
	css-set-fast ".Style_alien; text-shadow; 2px 2px 5px lightgreen";
	now the left hand status line is "[alien type][location of the player][roman type]";

Part - Lab

Lab is a room.  "You're in a high-tech lab."

The newspaper is in the lab.  The description of the newspaper is "The headline reads: [headline type]ALIENS INVADE EARTH![roman type]".

Part - Containment Facility

Containment Facility is north of Lab.  "You're in a high-tech alien containment facility."

The alien is in the Containment Facility.  The description of the alien is "You can hear the alien say to you in your mind, '[alien type]We come to Earth in peace.[roman type]'"
9. Fully modifying the status line
The status line, by default, is pretty small, and font changes there might not be as noticeable. There are a few fun ways you can modify just the status line, leaving the rest of the game alone.
Let’s start over with the same base code, and here we’ll only focus on the status line. I wasn’t very sold on that stencil font, so we’ll pick a new, substantial one from Google Fonts called Russo One, import it, and add it to the status line. So, to “When play begins”, add:
import-google-fonts "Russo+One";
css-set-fast ".GridWindow; font-family; Russo One, sans-serif";
If you Release the project and look at play.html, you should see the font in the status line. It looks appropriately futuristic. But let’s play into the spooky alien vibe, and make the font big and creepy green, and the background a very dark gray.
css-set-fast ".GridWindow; font-size; 40px";
css-set-fast ".GridWindow; color; #0EDE25"; [hex code for ectoplasm green]
css-set-fast ".GridWindow; background; #292929"; [hex code for dark gray]
Okay, if you test that, it looks like it could be cool, but the font is way too big! Rather than shrinking it to fit the status line, let’s enlarge the status line to fit the font. We need to do two things: we need to make the “height” of the status line larger, and we also need to move the top of the game text down a bit using “margin-top”. We’ll use seventy pixels for both.
css-set-fast ".GridWindow; height; 70px";
css-set-fast ".BufferWindow; margin-top; 70px";
Cool!
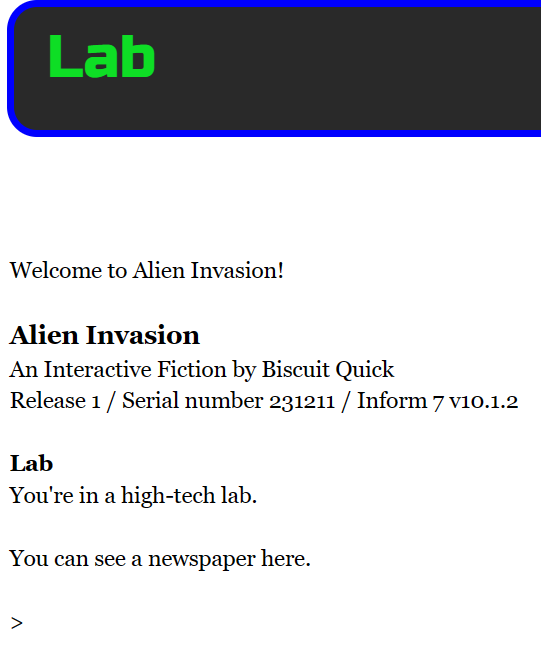
But you know what would be even cooler? How about some awesome red borders around part of the status line? Here, we’ll adjust “border-left” and “border-bottom” (there are also “border-top” and “border-right”). You can play with the pixels (again keeping number and “px” together) and color if you’d like.
css-set-fast ".GridWindow; border-left; 5px solid red";
css-set-fast ".GridWindow; border-bottom; 10px solid darkred";
Wow. It’s like a sculptor chiseled that status bar into my brain. Or, if you’d prefer a rounder approach, you could try “border-radius”. Let’s create a uniform, rounded blue border. You can keep the previous code.
css-set-fast ".GridWindow; border; 5px solid blue"; [this will overwrite the previous borders]
css-set-fast ".GridWindow; border-radius; 10px";
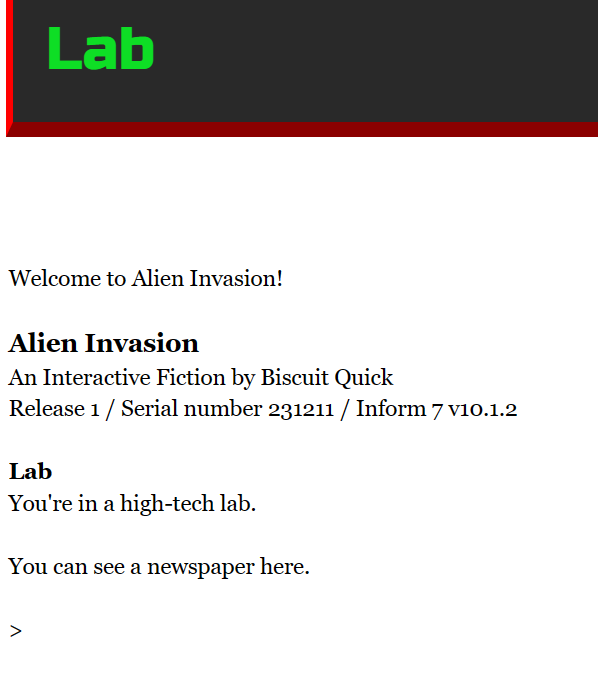
10. A one-column template
By default, Bisquixe releases with a cover image and a bit of informational text on the left-hand side of the screen. Perhaps you’d prefer the screen layout to be a single column that’s just the game.
Let’s return to our base code. We’re going to hide a few of the left-hand elements (namely “.coverimage” and “.links”, which should be somewhat self-explanatory), and then center the remaining game. The whole game lives in “#gameport”. We’ll adjust its “left” and “right” locations.
To “When play begins”, add:
css-set-fast ".coverimage; display; none";
css-set-fast ".links; display; none";
css-set-fast "#gameport; left; 20%";
css-set-fast "#gameport; right; 20%";
If you run that, you’ll see that we’ve succeeded! But perhaps you want to change the background of everything outside the game. To that, you can adjust the “.play” element:
css-set-fast ".play; background; lightblue";
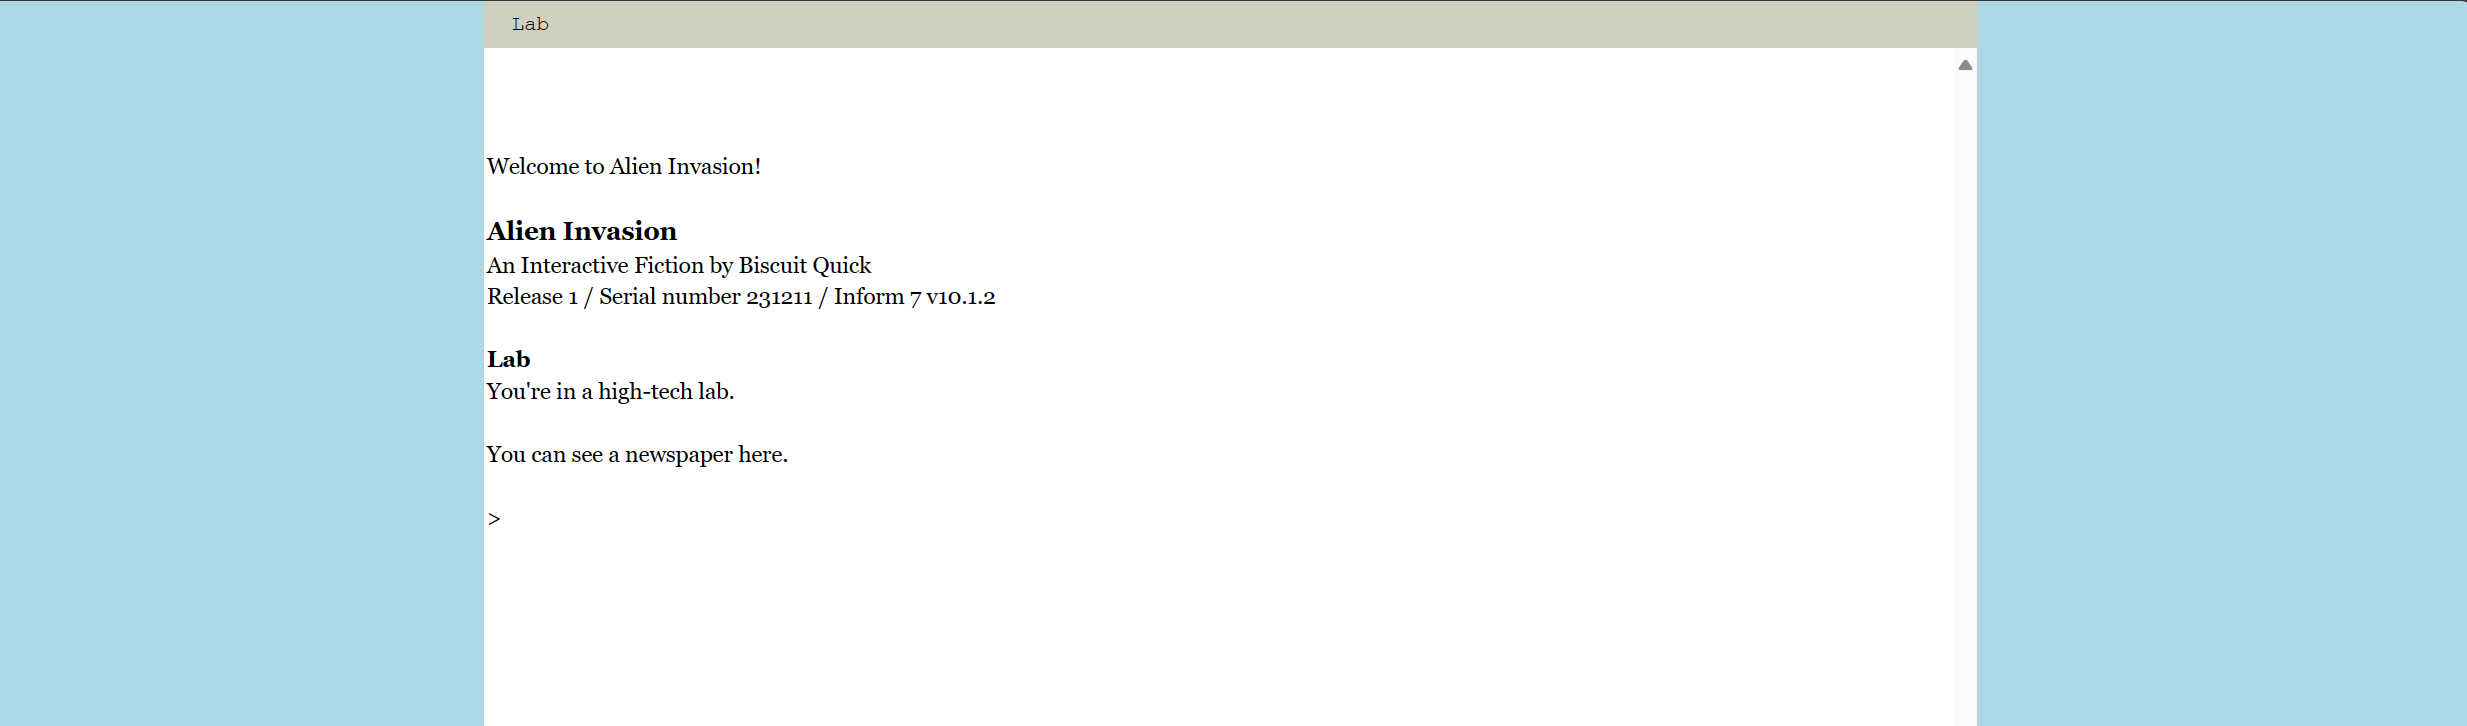
That’s a pretty pleasant layout, I think. You can try playing with the percentages: lower numbers will make the game take up a larger width of the screen.
If you must, you can also hide the Quixe credits in the bottom left:
css-set-fast ".interpretercredit;display;none";
11. Releasing your Bisquixe game
All of your stylings are lovely, but they won’t be seen by anyone else unless you publish your website online. Many online services, like itch.io and IFComp, ask that you upload a website as a .zip file which has a single index.html (the main web page).
With Bisquixe, we have a problem: all of our styling has been applied to play.html, and we really don’t use index.html at all. The solution, fortunately, is easy:
- Delete the current index.html file in the Releases folder inside your project’s .materials folder.
- Rename play.html to index.html.
- Zip up the Releases folder.
- Upload the zipped file to a hosting platform.
And you’re done!
12. Conclusion
Through the power of Bisquixe, you can now change the colors and fonts of a released Inform game entirely within Inform! If you’d like to learn more about CSS stylings, I highly recommend W3 Schools.
But remember that interactive fiction has text at its core. For playability and accessibility, you should also provide a downloadable version of your game as a .gblorb for use in offline play. There, players will see none of your stylings.
This guide tends to make some rather gauche design choices in order to demonstrate commands’ effects. Remember that a small amount of styling can often go a long way.
Good luck, and happy game and graphic designing!
Part II – Cookbook
This section is designed to give useful snippets of code or complete themes for use with Bisquixe.
13. Styling room headers
Bisquixe can let us style the room names that are printed when traveling from one room to another. The element is called “.Style_subheader”. We’ll use a Google font and turn the headers green.
When play begins:
	import-google-fonts "Bebas+Neue";
	css-set-fast ".Style_subheader; font-family; Bebas Neue, sans-serif";
	css-set-fast ".Style_subheader; font-size; 30px";
	css-set-fast ".Style_subheader; color; green";
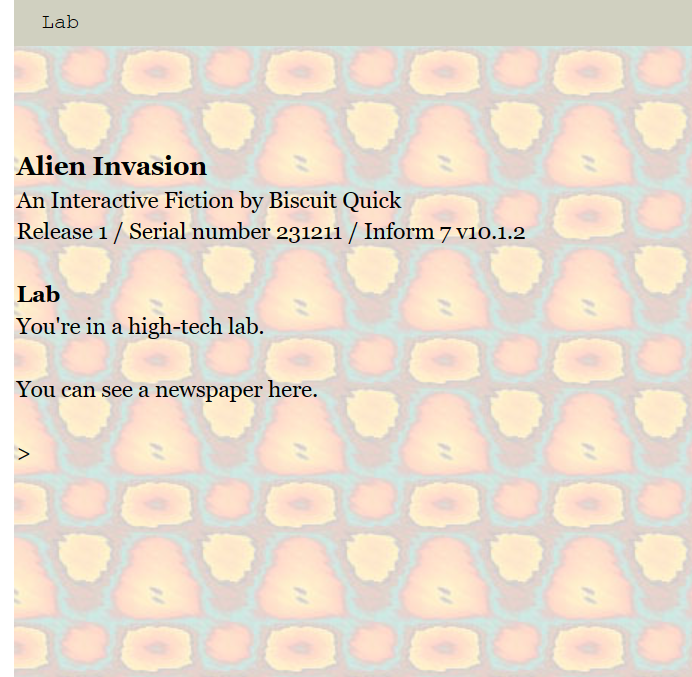
14. Gradients and background images
Using “background-image”, we can apply a colorful gradient to our game. (Note that there should be no spaces between the two listed colors.)
When play begins:
	css-set-fast ".BufferWindow; background-image; linear-gradient(yellow,orange)";
Or, if you remember late-nineties and early-aughts homemade websites, they often featured a textured background, such as sand, marble, or paper; others had more abstract designs. Against most rational advice, we can repeat that effect here. The background images are usually small and meant to be tiled. Your image (here, LOVE.JPG) needs to be placed in the Releases folder of your .materials folder, and the filename in Inform should match the capitalization of the file itself.
When play begins:
	css-set-fast ".BufferWindow; background-image; url('LOVE.JPG')";
15. Hide the scrollbar
To hide the scrollbar that appears on the right side of the game, try:
css-set-fast "::-webkit-scrollbar; display; none";
Authors will have to weigh the merits of this choice. Players will still be able to scroll via a mouse wheel or trackpad.
16. Hide the status line
All we need to do to hide the status line is tell it not to display.
css-set-fast ".GridWindow; display; none";
17. Increase the padding around the game text
If you feel the game text is too close to the edges of the box in which it lives, you can increase the margins. This is through the CSS property of “padding”.
css-set-fast ".BufferWindow; padding; 20px";
This will create a twenty-pixel margin around all of the text from the edges of the game area. A higher pixel value will inset the game even further. I sometimes feel that the text feels a little cramped on the left and bottom sides of the game area. You can instead adjust “padding-left” and “padding-bottom” (and “padding-right” and “padding-top”) separately.
css-set-fast ".BufferWindow; padding-left; 40px";
css-set-fast ".BufferWindow; padding-bottom; 100px";
18. Retro computer theme
Here is a (nearly) monochrome black-and-green theme with computer-y fonts. For an amber color, try hex code #cd8c00 to replace the green.
When play begins:
	import-google-fonts "Source+Code+Pro&family=Share+Tech+Mono";
	css-set-fast ".GridWindow; background; #00aa00"; [retro green]
	css-set-fast ".GridWindow; color; black";
	css-set-fast ".GridWindow; font-family; Share Tech Mono";
	css-set-fast ".GridWindow; font-size; 18px";
	css-set-fast ".BufferWindow; background; black";
	css-set-fast ".BufferWindow; color; #00aa00";
	css-set-fast ".BufferWindow; font-family; Source Code Pro";
	css-set-fast ".Input; color; #aaaaaa";
	css-set-fast ".Input.LineInput; font-family; Share Tech Mono";
	css-set-fast ".Style_input; color; #00aa00";
	css-set-fast ".Style_input; font-family; Share Tech Mono";
	css-set-fast ".play; background; #0a0b0a"; [dark gray]
	css-set-fast ".coverimage; display; none";
	css-set-fast ".links; display; none";
	css-set-fast "#gameport; left; 20%";
	css-set-fast "#gameport; right; 20%";
19. AGT colors
This theme presents the default colors for an AGT (Adventure Game Toolkit) game in all their glory.
When play begins:
	css-set-fast ".GridWindow; background; #aa0000"; [red]
	css-set-fast ".GridWindow; color; #ffff55"; [yellow]
	css-set-fast ".BufferWindow; background; #0000aa" [blue];
	css-set-fast ".BufferWindow; color; white";
	css-set-fast ".Input; color; #ffff55";
	css-set-fast ".Style_input; color; white";
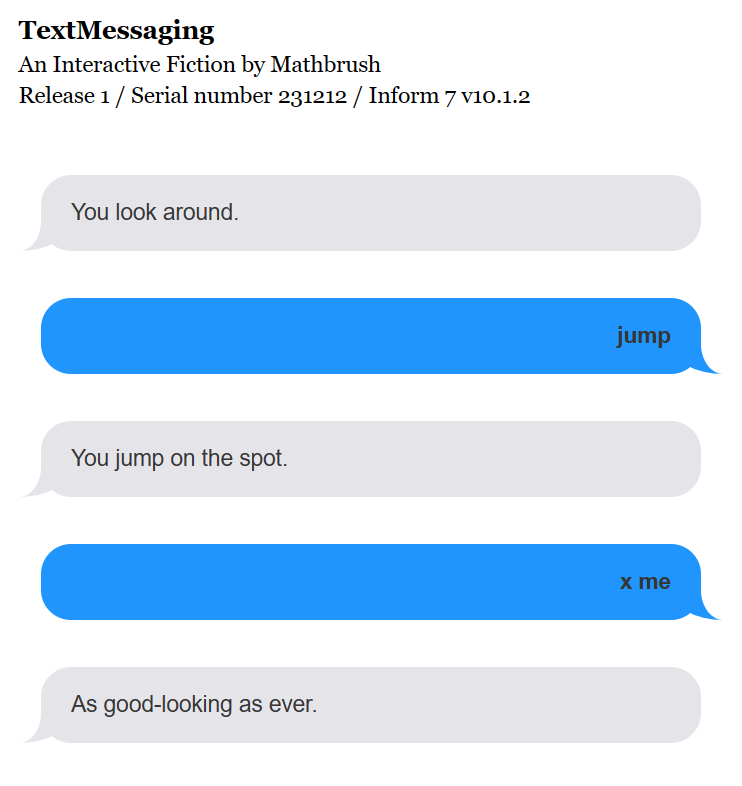
20. Text messaging theme
This example by @mathbrush (based on work by @malacostraca) formats your game to look like a text message conversation.
"TextMessaging" by Mathbrush

Release along with a "Bisquixe" interpreter.
Release along with a "Bisquixe" website.

Include Simple Multimedia Effects by Mathbrush.

Current Room is a room.

The room description heading rule does nothing.

Rule for constructing the status line:
	do nothing;

When play begins:
	css-set-fast ".BufferWindow;padding;100px 250px 6px 2px";
	css-set-fast ".GridWindow;background-color;white";
	css-set-fast ".coverimage;display;none";
	css-set-fast ".interpretercredit;display;none";
	css-set-fast ".links;display;none";
	css-set-fast ".Style_text;font-family; sans-serif";
	css-set-fast ".Style_text;border-radius; 20px 20px 20px 20px";
	css-set-fast ".Style_text;margin; 0 15px 10px";
	css-set-fast ".Style_text;padding; 15px 20px";
	css-set-fast ".Style_text;position; relative";
	css-set-fast ".Style_text;display; block";
	css-set-fast ".Style_text;width; 400px";
	css-set-fast ".Style_text;animation-name; popin";
	css-set-fast ".Style_text;animation-duration; 0.2s";
	css-set-fast ".Style_text;background-color; #E5E4E9";
	css-set-fast ".Style_text;color; #363636";
	css-set-fast ".Style_text:before; transform; rotateY(180deg)";
	css-set-fast ".Style_text:before;  border-color; #E5E4E9";
	css-set-fast ".Style_text:before;  left; -50px";
 	css-set-fast ".Style_text:before; border-color; #E5E4E9";
 	css-set-fast ".Style_text:before; border-radius; 50% 50% 50% 50%";
 	css-set-fast ".Style_text:before; border-style; solid";
 	css-set-fast ".Style_text:before; border-width; 0 20px";
 	css-set-fast ".Style_text:before; bottom; 0";
 	css-set-fast ".Style_text:before; clip; rect(20px, 35px, 42px, 0px)";
 	css-set-fast ".Style_text:before; content; ' '";
 	css-set-fast ".Style_text:before; height; 40px";
 	css-set-fast ".Style_text:before; position; absolute";
  	css-set-fast ".Style_text:before;right; -50px";
 	css-set-fast ".Style_text:before; width; 30px";
	[Now for your input]
	css-set-fast ".Style_input;font-family; sans-serif";
	css-set-fast ".Style_input;border-radius; 20px 20px 20px 20px";
	css-set-fast ".Style_input;margin; 0 15px 10px";
	css-set-fast ".Style_input;padding; 15px 20px";
	css-set-fast ".Style_input;position; relative";
	css-set-fast ".Style_input;display; block";
	css-set-fast ".Style_input;width; 400px";
	css-set-fast ".Style_input;animation-name; popin";
	css-set-fast ".Style_input;animation-duration; 0.2s";
	css-set-fast ".Style_input;background-color; #2095FE";
	css-set-fast ".Style_input;color; #363636";
	css-set-fast ".Style_input:before; transform; rotateY(0deg)";
	css-set-fast ".Style_input:before;  border-color; #2095FE";
	css-set-fast ".Style_input:before;  left; 420px";
 	css-set-fast ".Style_input:before; border-color; #2095FE";
 	css-set-fast ".Style_input:before; border-radius; 50% 50% 50% 50%";
 	css-set-fast ".Style_input:before; border-style; solid";
 	css-set-fast ".Style_input:before; border-width; 0 20px";
 	css-set-fast ".Style_input:before; bottom; 0";
 	css-set-fast ".Style_input:before; clip; rect(20px, 35px, 42px, 0px)";
 	css-set-fast ".Style_input:before; content; ' '";
 	css-set-fast ".Style_input:before; height; 40px";
 	css-set-fast ".Style_input:before; position; absolute";
  	css-set-fast ".Style_input:before;right; 420px";
 	css-set-fast ".Style_input:before; width; 30px";
 	css-set-fast ".Buffer_input; text-align; right";
	now the command prompt is " ";
	css-set-fast ".LineInput;border-radius; 20px 20px 20px 20px";
	css-set-fast ".LineInput;color; #363636";
	css-set-fast ".LineInput;margin; 0 15px 10px";
	css-set-fast ".LineInput;padding; 15px 20px";
	css-set-fast ".LineInput;position; relative";
	css-set-fast ".LineInput;display; block";
	css-set-fast ".LineInput;width; 400px";

To say text-style:
	set-any-class "text";

Before issuing the response text of a response: say text-style.

Before doing something:
	say text-style;

The description of Current Room is "[text-style]You look around.[roman type]"
21. Game in a bubble (TV theme)
By hiding the status bar and scroll bar, we can make our game appear in a single bubble, with a shape reminiscent of an old TV. With additional styling, perhaps the game could be a porthole on a seafaring or spacefaring vessel.
When play begins:
	css-set-fast ".GridWindow; display; none";
	css-set-fast ".BufferWindow; margin-top; 5%";
	css-set-fast ".BufferWindow; margin-bottom; 10%";
	css-set-fast ".BufferWindow; border-radius; 50px";
	css-set-fast ".BufferWindow; background; ghostwhite";
	css-set-fast ".BufferWindow; color; #0a0a0a"; [dark gray]
	css-set-fast ".BufferWindow; padding; 25px"; [move the text away from the sides]
	css-set-fast ".play; background; #0a0a0a";
	css-set-fast "#windowport; background; #0a0a0a";
	css-set-fast ".coverimage; display; none";
	css-set-fast ".links; display; none";
	css-set-fast "#gameport; left; 20%";
	css-set-fast "#gameport; right; 20%";
	css-set-fast "::-webkit-scrollbar; display; none";

22. Additional documentation and further Bisquixe capabilities
In addition to styling, Bisquixe has new commands for working with hyperlinks, sound, and images.
You can learn more about all of these topics on its official development and documentation thread.
23. Usage and guide version
You are welcome to copy, modify, and use any of the code provided in this guide in your Inform projects.
Version 1.02
December 14, 2023
Bisquixe version 3
Simple Multimedia Effects for V10 version 4
